Blog Archives
Using ssh tunneling to gain access to remote VirtualBox guest attached to NAT
I’m building virtual machines on a weekly basis, sometimes daily. Most often I create various Linux distros as guests on VirtualBox hosts. VirtualBox hosts are either Windows or Linux computers. Majority of guests are built for test purposes only, so they often live in a “cage” behind a VirtualBox NAT. Guests with NIC attached to NAT have access to the LAN and Internet, but the opposite is not possible out of the box. So my typical NIC configuration for VirtualBox guest looks like this:

Fortunately, VirtualBox allows to configure port forwarding for NAT attached NIC’s. For every Linux guest I setup port forwarding for ssh (22), so that I can use MobaXterm (on Windows7/10) to connect to the Linux guest from the host itself. That’s how it looks:


That’s fine, as long as you have access to the host where your VBox guest is running, you can use MobaXterm to connect to the virtualbox guest. Seating at Windows 7 workstation we simply open MobaXterm and type:

Sometimes, I build virtual machines that I want to access from other machines as well and I don’t like to weaken security by attaching guest NIC’s to a Bridged adapter. Again, let’s call wonderful ssh to the rescue.
Situation: VirtualBox host is a Windows 2008 R2 Server (I’ll refer to this host as VBOXHOST). On this host we’re hosting Linux guest (OL7ORA12R2) with the latest Oracle 12.2 installation. Guest is behind a NAT, but with a port forwarding setup for ssh as shown above (picture 3). I would like to have access to this guest from remote workstation running Windows 7. All machines (physical Windows 7 & 2008R2, plus virtual Linux 7) are firewalled with ssh ports (22) left opened. On Windows 2008R2 is already running OpenSSH (Cygwin).
All that we need to do to get sqlplus access to remote Oracle 12.2 running in Linux guest from Windows 7 workstation is this:
On Windows 7 we start MobaXTerm terminal and run (note that by default Mobaxterm uses implicitly -X for ssh):
$ ssh -L 12201:localhost:12201 alesk@vboxhost -t ssh -L 12201:localhost:1521 alesk@localhost -p 2222

First, we're asked for password to connect to vbohost (Windows 2008 R2), then we're asked for password to login to virtual machine guest (Linux).

Note, that we must left the MobaXterm window open for a duration of SQL*Plus session that follows...

Now, we can connect from Windows 7 Workstation to the remote Oracle DB,  first open cmd and type:
cmd> sqlplus /nolog
cmd> connect c##alesk@'localhost:12201/ORA122'
What happens is illustrated on this picture:
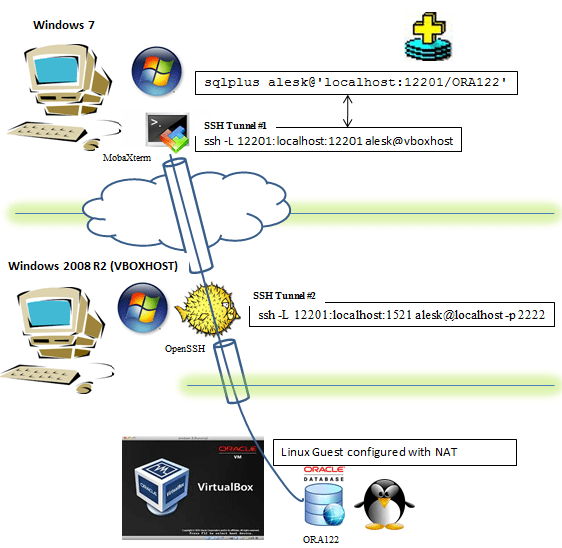
- On Windows 7 we launched MobaXterm and run ssh command:
- On Windows 7 we opened sqlplus, connecting to localhost:12201. SSH redirected traffic to VBOXHOST:12201 (hop 1), followed by second redirection (hop 2) to Listener running inside VirtualBox.
$ ssh -L 12201:localhost:12201 alesk@vboxhost -t ssh -L 12201:localhost:1521 alesk@localhost -p 2222

ssh -L 12201:localhost:12201 alesk@vboxhost  ........... tunnel #1 forwarding port 12201 (Windows 7) to port VBOXHOST (port 12201), in both cases on localhost.
ssh -L 12201:localhost:1521 alesk@localhost -p 2222 .... tunnel #2 forwarding port 12201 (VBOXHOST) to port 1521 inside VirtualBox Guest, using port 2222 redirection done by VirtualBox itself.
What if we would like to run some GUI application on Linux guest? We can use X session forwarding, allowing us to see the GUI on our Windows 7 workstation. Like this:
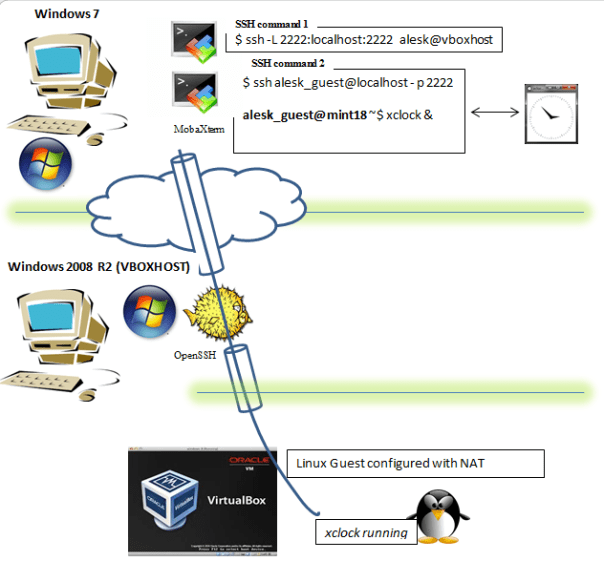
We must open two MobaXterm terminals on Windows 7 workstation.
In the first MobaXterm terminal we type:
$ ssh -L 2222:localhost:2222 alesk@vboxhost
In the second MobaXterm terminal we type:
$ ssh alesk_guest@localhost -p 2222
alesk_guest@mint18 ~$ xclock &
….and xclock will popup on Windows 7 workstation but actually running on Linux guest. Note that alesk_guest is a Linux user on LinuxMint 18 guest and that guest is configured in the same way as before, behind a NAT and with ssh port forwarding (2222) at VirtualBox level. This option is handy to lauch Oracle gui configuration tools, like dbca, netca etc.
Windows 10 – disable Windows Update automatic reboot
Despite of the Linux (Mint & Fedora) dominance on my desktops and laptops, I nevertheless need at least one Windows workstation at work. Recently, I started to move part of my Windows (only) application stack from Windows 7 Enterprise to Windows 10 Enterprise. One thing that bothers me from day one on Windows 10 is automatic updating and rebooting. I’m fine with the automatic update part, but certainly don’t like auto-reboot part, my main desktop simply must run non-stop, usually for several months in a row. Here is a mini “how-to” that I used to change default behavior:
Open Local Security Policy Editor
Make a search for “Edit group policy”, then open “Computer Configuration” -> “Administrative Templates” -> “Windows Components” -> “Windows Update”


Double clikc on “Configure Automatic Updates”….

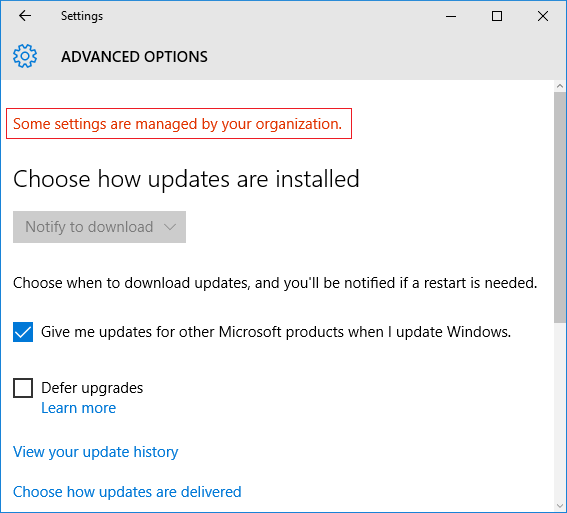
…and click on “Enabled” and select the way you want updates to be downloaded and installed. Here is my choice…

After reboot, you can check Windows Update Settings, where you should see warning that “Some settings are managed by your organization”….
Another policy option that you probably want to enable is “No auto-restart with logged on users…”:

MS Access 2016 — a bug finally fixed after 16 years
[UPDATE on February 2018 — make sure that you read Part 2 as well!]
Around ~2001/2002 we found a bug in Microsoft MS Access in a combination with Oracle ODBC.
Bug is finally fixed in MS Access 2016.
Imagine this Oracle table:
create table salary (name varchar2(10), salary number(7,2), salary2 number);

insert into salary values ('King',12345.55,12345.55);

1 row created.

commit;

Commit complete.

select * from salary;

NAME           SALARY    SALARY2
---------- ---------- ----------
King         12345,55   12345,55
Note that salary table has salaries stored in NUMBER(n,m) and plain NUMBER data types.
Let’s see what we get if we use MS Access 2010 with Microsoft ODBC driver for Oracle to link the salary table:
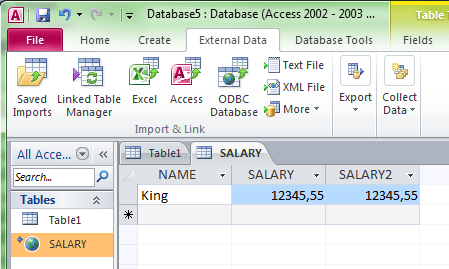
Everything is OK. Now, let’s try to link the same table, but this time with Oracle ODBC driver:
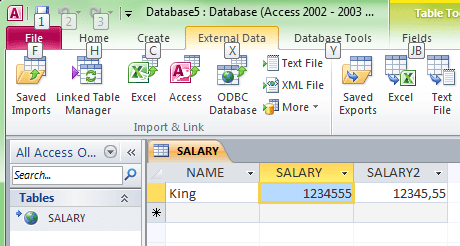
Oooppsss. MS Access converted decimal number 12345,55 to an integer 1234555. Someone would argue that this can also be a bug in Oracle ODBC. But it isn’t, because Excel (or any other ODBC app) has no problem handling decimal data over Oracle ODBC driver. This bug persisted in all recent releases MS Office 2000, 2002, 2003, 2007, 2010 and 2013. Using Oracle ODBC with any of those MS Access versions was a big NO for us.
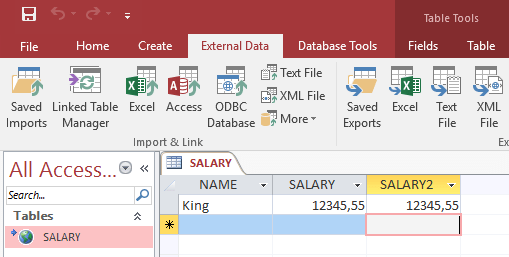
The problem is that the only workaround was to link tables using Microsoft ODBC driver for Oracle, which is 32-bit only, deprecated by Microsoft and not enhanced in at least a decade. You can imagine my surprise after I installed 64-bit version of MS Office 2016 and trying to link to Oracle table with Oracle12c ODBC driver (also tested with older 11g driver) and realized that Microsoft finally nailed the bug after 16+ years.
Oh, and if you wonder if I submitted bug report to Microsoft and Oracle sixteen years ago? Yes, I did. Microsoft product manager simply redirected me to Oracle Support and Oracle support told me that they think that the problem are undocumented hooks in MS Access, hence, MS ODBC driver for Oracle somehow works and driver written by Oracle according to official ODBC specs doesn’t. Oracle suspicion was correct anyway, because the bug was always limited to MS Access.
Setup OpenSSH (Cygwin) for public key authentication
It took me awhile to realize that my SSHD installation on my Windows 2012R2 was not ready yet to accept public key authentication, which is a key feature. If we want to automate some tasks we need passwordless authentication to our Windows 2012 R2 server.
By default sshd is running under Local System account and this is in conflict with implementation of public key authentication of OpenSSH in Cygwin. If you recollect from my last post, special account was created, called cyg_server:
*** Info: On Windows Server 2003, Windows Vista, and above, the
*** Info: SYSTEM account cannot setuid to other users -- a capability
*** Info: sshd requires.  You need to have or to create a privileged
*** Info: account.  This script will help you do so.

*** Info: It's not possible to use the LocalSystem account for services
*** Info: that can change the user id without an explicit password
*** Info: (such as passwordless logins [e.g. public key authentication]
*** Info: via sshd) when having to create the user token from scratch.
*** Info: For more information on this requirement, see
*** Info: https://cygwin.com/cygwin-ug-net/ntsec.html#ntsec-nopasswd1

*** Info: If you want to enable that functionality, it's required to create
*** Info: a new account with special privileges (unless such an account
*** Info: already exists). This account is then used to run these special
*** Info: servers.

*** Info: Note that creating a new user requires that the current account
*** Info: have Administrator privileges itself.

*** Info: No privileged account could be found.

*** Info: This script plans to use 'cyg_server'.
*** Info: 'cyg_server' will only be used by registered services.
*** Query: Do you want to use a different name? (yes/no) no
*** Query: Create new privileged user account 'ACMEHOST\cyg_server' (Cygwin name: 'cyg_server')? (yes/no) yes

*** Info: Please enter a password for new user cyg_server.  Please be sure
*** Info: that this password matches the password rules given on your system.
*** Info: Entering no password will exit the configuration.
*** Query: Please enter the password: mysecret
*** Query: Reenter:

*** Info: User 'cyg_server' has been created with password 'mysecret'.
The important info is this:
*** Info: It’s not possible to use the LocalSystem account for services
*** Info: that can change the user id without an explicit password
*** Info: (such as passwordless logins [e.g. public key authentication]
*** Info: via sshd) when having to create the user token from scratch.
So, the first thing that we need to do is to stop “CYGWIN sshd” service and change logon account for the sshd service as shown on the following screenshots:


At this point you can not start the service yet, if you try you’ll find in /var/log/sshd.log the following error:
/var/empty must be owned by root and not group or world-writable.
What we need to do is to change owner of the directory /var/empty from SYSTEM to cyg_server. Open cygwin.bat and run:
// check current permissions

$ ls -al /var/empty

total 0
drwx------+ 1 SYSTEM ACMEHOST+None 0 Mar  6 12:10 .
drwxr-xr-x+ 1 alesk ACMEHOST+None 0 Mar  6 12:10 ..

or with:

$ getfacl /var/empty

# file: /var/empty
# owner: SYSTEM
# group: ACMEHOST+None
user::rwx
group::---
other:---
default:user::rwx
default:group::r-x
default:other:r-x

// So I tried to change the owner to cyg_server:

$ chown cyg_server /var/empty
invalid user cyg_server

// What? At first I didn't know why is cyg_server invalid, but then
// I realized that I added only one (my) account in /etc/passwd, so I
// need to append cyg_server user as well:

$ mkpasswd -l -u cyg_server >> /etc/passwd

// restared cygwin.bat shell and run

$ chown ACMEHOST+cyg_server /var/empty

Remember that by default username is prefixed by hostname.

// if you ever wish to change back to Local System account,
// all that is needed is to again change Service account
// under which CYGWIN sshd is running and owner of /var/empty:

$ chown SYSTEM /var/empty
At this point you should be able to start “CYGWIN sshd” service under local cyg_server account. The last thing you need to do is to test the connection with public key authentication. I used Mobaxterm for that on my workstation ACMEWKS, but you could as easily use Cygwin SSH on your workstation:
In MobaXterm window:
We need to generate some public-private keys. Note that in our case we need PK keys for passwordless authentication, so we didn't password protect rsa private key in the example that follows.

[alesk.ACMEWKS] ? ssh-keygen -t rsa

Generating public/private rsa key pair.
Enter file in which to save the key (/home/mobaxterm/.ssh/id_rsa):
Enter passphrase (empty for no passphrase):
Enter same passphrase again:
Your identification has been saved in /home/mobaxterm/.ssh/id_rsa.
Your public key has been saved in /home/mobaxterm/.ssh/id_rsa.pub.
The key fingerprint is:
9a:da:35:e8:ca:6a:14:e4:f0:8c:10:1c:21:41:fe:81 alesk@ACMEWKS
The key's randomart image is:
+--[ RSA 2048]----+
|**o              |
|=.o              |
|.E .             |
|. * .            |
|   o    S        |
|  .    +         |
| .    + o        |
|  .. + . .       |
| ...+.o          |
+-----------------+

Remember, that /home/mobxterm/.ssh is volatile, after you close the MobaXterm this directory is gone, so you should copy public/private keys to some local, permanent directory....

[alesk.ACMEWKS] ? ls -al /home/mobaxterm/.ssh
total 5
drwx------    1 alesk   UsersGrp         0 Mar  5 15:46 .
drwx------    1 alesk   UsersGrp         0 Mar  5 11:09 ..
-rw-------    1 alesk   UsersGrp      1675 Mar  5 15:46 id_rsa
-rw-r--r--    1 alesk   UsersGrp       396 Mar  5 15:46 id_rsa.pub
-rw-r--r--    1 alesk   UsersGrp       171 Mar  5 09:11 known_hosts

[alesk.ACMEWKS] ? mkdir /cygdrive/g/ssh
[alesk.ACMEWKS] ? cp /home/mobaxterm/.ssh/id_rsa* /cygdrive/g/ssh

// copy public key to remote host
[alesk.ACMEWKS] ? scp /cygdrive/g/ssh/id_rsa.pub alesk@ACMEHOST:~/.ssh

// append previoulsy copied public key to authorized_keys on remote host
$ ssh alesk@ACMEHOST  'cat ~/.ssh/id_rsa.pub >> ~/.ssh/authorized_keys'
Now, we can try to connect from ACKMEWKS to ACMEHOST with PK authentication:
[alesk.ACMEWKS] ssh -i /cygdrive/g/ssh/id_rsa alesk@ACMEHOST
You should be logged on ACMEHOST without prompt for a password. Properly protect private key. Better yet, you should limit what someone can execute execute via passwordless ssh connection with the help of prefix in authorized_keys file for each public key (see this for an example).
And finally, you can troubleshoot ssh connection by turning on verbose mode (-v, -vvv), for example:
[alesk.ACMEWKS] ssh -vvv -i /cygdrive/g/ssh/id_rsa alesk@ACMEHOST
Installing Windows 8.1 as VirtualBox Guest (Error 0x000000C4)
A short reminder to myself of what to do to prepare VirtualBox guest VM for Windows 8.1 (or Windows Server 2012 R2) installation:
Determine VM name dedicated to Windows 8.1 installation:

cmd> "c:\Program Files\Oracle\VirtualBox\VBoxManage.exe" list vms

"WIndows8-64" {2962e10b-2168-4d0c-b4b0-b9b104b66661}

Turn on CMPXCHG16B CPU property for VM:
"c:\Program Files\Oracle\VirtualBox\VBoxManage.exe" setextradata "WIndows8-64" VBoxInternal/CPUM/CMPXCHG16B 1

You must be logged in to post a comment.