Blog Archives
Installing ArcServe 17.5 agent on Oracle Linux 7.4
We’re slowly migrating our DB servers to Oracle Linux 7 and at the same time we’ll upgrade ArcServe 16/16.5 backup software to version 17.5. Unfortunately, the information that we found on the web regarding support for Oracle Linux 7.x is not consistent with the readme document that comes with the media.
Here is what official ArcServe Backup compatibility matrix is saying about OEL7 support:
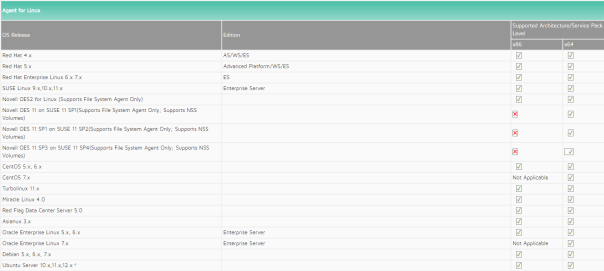
And below, you’ll see what we got during agent installation. We believe that this inconsistency is due to the poor installation script maintenance (apparently updated in 2015). The installation of the agent 17.5 (+ mandatory patch 802!) on Oracle Linux 7.4 was a breeze .
$ lsb_release -d
Description:    Oracle Linux Server release 7.4

$ su - root
# mkdir /media/arcserve
# mount -t iso9660 /dev/cdrom /media/arcserve
# cd /media/arcserve/Arcserve_Backup/DataMoverandAgent/Linux

./install

This distribution of Linux is not certified by Arcserve Backup. If you run it, you may experience problems.
(y) to continue, (q) to quit :

<< a lot of license gibberish that you'll likely skip >>

Please enter your choice:[Y|N] (default: N)Y
Do you want to view the installation notes? (y/n):(default: y) n
Do you want to view the installation notes? (y/n):(default: y) n

Preparing for the installation, please wait...|

The following products are available to install:


#####################################################################
#       Arcserve Installation Options
#####################################################################
#  1. Arcserve Backup for Linux Data Mover                               (ABdatmov)
#  2. Arcserve Backup for Linux Client Agent                             (ABagntux)
#  3. Arcserve Backup for Linux Agent for Oracle                         (ABora)
#  4. Arcserve Backup for Linux Enterprise Option for SAP R/3 for Oracle (ABsap)
#  5. Arcserve Backup for Linux Enterprise Option for SAP HANA           (ABhana)
#
#  0. Quit
#####################################################################

Note: Client Agent will be installed automatically if Data Mover is selected.
Please enter your selection separated by "," For example: 1,2. Press Enter to select the default components (E.g. Data Mover, Client Agent)...

Your choices are:2

Please specify the installation path of Client Agent for Linux                   (default: /opt/Arcserve):

The following program will be installed:

  . Install Client Agent for Linux                     (ABagntux)      ==> [ /opt/Arcserve/ABuagent ]

Are you sure? (y)es/(n)o/(q)uit: y

All Arcserve Backup agents can be configured for automatic startup
and shutdown as part of your operating system startup and shutdown.
Do you want to enable automatic startup and shutdown of all backup agents? [y|n]:(default: y) y

Checking available space in /opt/Arcserve                     ==> [ OK ]


Installation log file is                           ==> [ /tmp/ARCserveInstall092117-1219.log ]

    Common Agent Module                      (ABcmagt)       ==> [ INSTALL SUCCESSFUL ]
    Client Agent for Linux                   (ABagntux)      ==> [ INSTALL SUCCESSFUL ]

###########################################################################

    Installation log file is                      ==> [ /tmp/ARCserveInstall092117-1219.log ]
###########################################################################


Do you want to view the readme? [y|n]:(default: y) y


<**snip** AND HERE IS THE LIST OF SUPPORTED OS's, OEL 7 is not mentioned! **snip**>

3.2  Supported Operating Systems for the Client Agent for Linux

You can install the Arcserve Backup Client Agent for Linux
on the following operating systems:

 *   Community ENTerprise Operating System 5.x, including SMP
     through 6.3 (x86, AMD64, Intel EM64T)

 *   Oracle Enterprise Linux Server 5.5 including SMP through
     6.3 (x86, AMD64, Intel EM64T)

 *   SUSE Linux Enterprise Server 9.x including SMP through 11
     SP2 (x86, AMD64, Intel EM64T)

 *   Novell Open Enterprise Server 2 10.x (x86, AMD64, Intel
     EM64T)

 *   Novell Open Enterprise Server 11, SP1 (AMD64, Intel EM64T)

 *   Turbolinux 11.x (x86, AMD64, Intel EM64T)

 *   Miracle Linux 4.0 (x86, AMD64, Intel EM64T)

 *   Red Flag Data Center Server 5.0 (x86, AMD64, Intel EM64T)

 *   Asianux 3.x (x86, AMD64, Intel EM64T)

 *   Debian 5.x through 6.06 (x86, AMD64, Intel EM64T)

 *   Ubuntu Server 10.04 LTS through 12.04 (x86, AMD64, Intel
     EM64T)

 *   Red Hat Enterprise Linux Server 4.x including SMP through
     6.3 (x86, AMD64, Intel EM64T)

 *   Red Hat Enterprise Linux 7 (AMD64, Intel EM64T)

 <**snip**  ........................................................... **snip**>
That’s it. We can start or stop the agent with the usual commands:
Start and stop the agent:

sudo  /etc/init.d/bab_agent stop
sudo /etc/init.d/bab_agent start

or simply:

caagent stop
caagent start
You should also download and apply patch P00000802.zip before putting agent in production:
![]()
Download patch P00000802.zip from ArcServe support.

# cd /home/alesk/Downloads/ArcServe-Patch/
# unzip P00000802.zip
# caagent stop
Shutting down Arcserve Backup Universal Agent process...Down.

-- backup original file
# cp -p /opt/Arcserve/ABuagent/uagentd /opt/Arcserve/ABuagent/uagentd.BkpP00000802

# cp uagentd /opt/Arcserve/ABuagent
# caagent start
If you have firewall enabled, then you’ll have to add port 6051 to the exception list:
sudo firewall-cmd --permanent --zone=public --add-port=6051/udp
sudo firewall-cmd --permanent --zone=public --add-port=6051/tcp
sudo firewall-cmd --reload
Agent configuration:
Configuration:

$ sudo nano /opt/Arcserve/ABcmagt/agent.cfg

[0]
#[LinuxAgent]
NAME      LinuxAgent
VERSION   17.5
HOME      /opt/Arcserve/ABuagent
#ENV      CA_ENV_DEBUG_LEVEL=4
ENV       AB_OS_TYPE=ORACLEAMERICA_X86_64
ENV       UAGENT_HOME=/opt/Arcserve/ABuagent
#ENV       LD_ASSUME_KERNEL=2.4.18
ENV       LD_LIBRARY_PATH=/opt/Arcserve/ABcmagt:$LD_LIBRARY_PATH:/SharedComponents/lib:/opt/Arcserve/ABuagent/lib
ENV       SHLIB_PATH=/opt/Arcserve/ABcmagt:$SHLIB_PATH:/SharedComponents/lib:/opt/Arcserve/ABuagent/lib
ENV       LIBPATH=/opt/Arcserve/ABcmagt:$LIBPATH:/SharedComponents/lib:/opt/Arcserve/ABuagent/lib
ENV       CAPKIHOME=/opt/Arcserve/ABcmagt/ETPKI
BROWSER   cabr
AGENT     uagentd
MERGE     umrgd
VERIFY    umrgd
NOPASSWORD                     <<< ADDED...enable single user mode, this is needed for ACL's
CAUSER A:alesk N:root          <<< ADDED...Access Control List (A=allow access, N=Deny Access)

[36]
#[ABcmagt]
#NAME     ABcmagt
#HOME     /opt/Arcserve/ABcmagt
#TCP_PORT  6051
#UDP_PORT  6051
#UDP_BCAST_PORT  41524
#DOS_MAXITEMS    1000
#DOS_DEFAULTTIMEOUT   30
NO_HOSTS_EQUIV=1               <<< ADDED...disable UNIX/Linux host equiv. authentication

$ sudo caagent stop
$ sudo caagent start
Using ssh tunneling to gain access to remote VirtualBox guest attached to NAT
I’m building virtual machines on a weekly basis, sometimes daily. Most often I create various Linux distros as guests on VirtualBox hosts. VirtualBox hosts are either Windows or Linux computers. Majority of guests are built for test purposes only, so they often live in a “cage” behind a VirtualBox NAT. Guests with NIC attached to NAT have access to the LAN and Internet, but the opposite is not possible out of the box. So my typical NIC configuration for VirtualBox guest looks like this:

Fortunately, VirtualBox allows to configure port forwarding for NAT attached NIC’s. For every Linux guest I setup port forwarding for ssh (22), so that I can use MobaXterm (on Windows7/10) to connect to the Linux guest from the host itself. That’s how it looks:


That’s fine, as long as you have access to the host where your VBox guest is running, you can use MobaXterm to connect to the virtualbox guest. Seating at Windows 7 workstation we simply open MobaXterm and type:

Sometimes, I build virtual machines that I want to access from other machines as well and I don’t like to weaken security by attaching guest NIC’s to a Bridged adapter. Again, let’s call wonderful ssh to the rescue.
Situation: VirtualBox host is a Windows 2008 R2 Server (I’ll refer to this host as VBOXHOST). On this host we’re hosting Linux guest (OL7ORA12R2) with the latest Oracle 12.2 installation. Guest is behind a NAT, but with a port forwarding setup for ssh as shown above (picture 3). I would like to have access to this guest from remote workstation running Windows 7. All machines (physical Windows 7 & 2008R2, plus virtual Linux 7) are firewalled with ssh ports (22) left opened. On Windows 2008R2 is already running OpenSSH (Cygwin).
All that we need to do to get sqlplus access to remote Oracle 12.2 running in Linux guest from Windows 7 workstation is this:
On Windows 7 we start MobaXTerm terminal and run (note that by default Mobaxterm uses implicitly -X for ssh):
$ ssh -L 12201:localhost:12201 alesk@vboxhost -t ssh -L 12201:localhost:1521 alesk@localhost -p 2222

First, we're asked for password to connect to vbohost (Windows 2008 R2), then we're asked for password to login to virtual machine guest (Linux).

Note, that we must left the MobaXterm window open for a duration of SQL*Plus session that follows...

Now, we can connect from Windows 7 Workstation to the remote Oracle DB,  first open cmd and type:
cmd> sqlplus /nolog
cmd> connect c##alesk@'localhost:12201/ORA122'
What happens is illustrated on this picture:
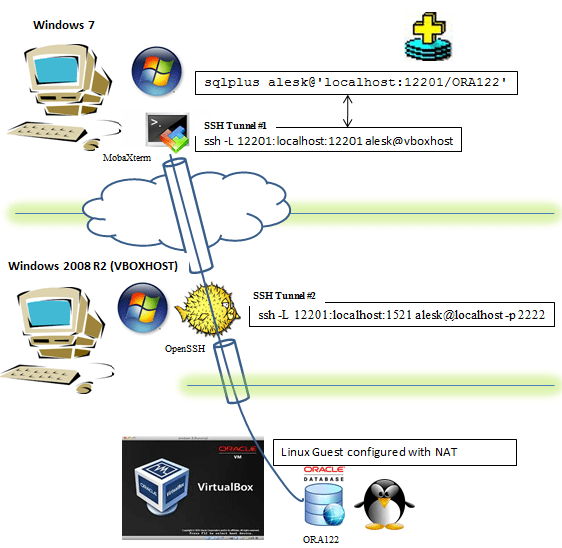
- On Windows 7 we launched MobaXterm and run ssh command:
- On Windows 7 we opened sqlplus, connecting to localhost:12201. SSH redirected traffic to VBOXHOST:12201 (hop 1), followed by second redirection (hop 2) to Listener running inside VirtualBox.
$ ssh -L 12201:localhost:12201 alesk@vboxhost -t ssh -L 12201:localhost:1521 alesk@localhost -p 2222

ssh -L 12201:localhost:12201 alesk@vboxhost  ........... tunnel #1 forwarding port 12201 (Windows 7) to port VBOXHOST (port 12201), in both cases on localhost.
ssh -L 12201:localhost:1521 alesk@localhost -p 2222 .... tunnel #2 forwarding port 12201 (VBOXHOST) to port 1521 inside VirtualBox Guest, using port 2222 redirection done by VirtualBox itself.
What if we would like to run some GUI application on Linux guest? We can use X session forwarding, allowing us to see the GUI on our Windows 7 workstation. Like this:
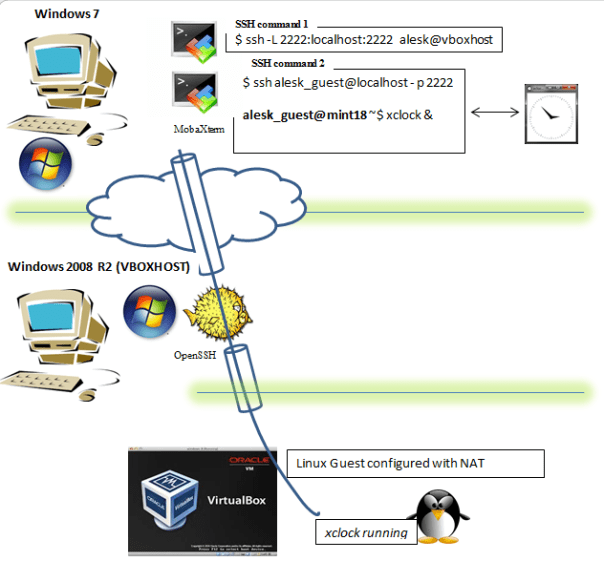
We must open two MobaXterm terminals on Windows 7 workstation.
In the first MobaXterm terminal we type:
$ ssh -L 2222:localhost:2222 alesk@vboxhost
In the second MobaXterm terminal we type:
$ ssh alesk_guest@localhost -p 2222
alesk_guest@mint18 ~$ xclock &
….and xclock will popup on Windows 7 workstation but actually running on Linux guest. Note that alesk_guest is a Linux user on LinuxMint 18 guest and that guest is configured in the same way as before, behind a NAT and with ssh port forwarding (2222) at VirtualBox level. This option is handy to lauch Oracle gui configuration tools, like dbca, netca etc.
xrdp on Raspberry Pi 2 with Slovenian keyboard
This is a short memo about setting up xrdp on my Raspberry Pi 2 with freshly installed Ubuntu Mate 16.04. The objective is to run RPI headless on run level 3 (multi-user.target in systemd parlance), but with the option to have GUI access from my Windows 10 workstation via RDP (90% of the time, I’ll be using MobaXterm to ssh into RPI). Primary role of this “machine” will be executing some DBA related python scripts, some of those scripts will produce some graphics, nothing fancy, but still a lot simpler to maintain if I can login from time to time to RPI desktop.
Install xrdp:
$ ssh -X alesk@rpi-mate
$ sudo apt-get install xrdp
$ reboot
// note down your IP
$ ip addr
On Windows desktop open Remote desktop and connect to RPI. You’ll get prompt like the one on the picture:

Enter username and password and wait for the desktop to appear. The problem however is that by default I was stuck with the US keyboard without the way to change it.
With some googling I found out, that I need to find my country code for the xrdp key mapping ini file, for example here. In my case, it’s 0x0424 – sl Slovenian.
I used country code for the naming of generated keyboard mapping file.
$ ssh alesk@rpi-mate
$ xrdp-genkeymap km-0424.ini
$ sudo cp km-0424.ini /etc/xrdp
$ sudo chown xrdp:xrdp /etc/xrdp/km-0424.ini
$ sudo service xrdp restart
Now, after reconnecting to my RPI with Remote Desktop client, I got desktop with functional Slovenian keyboard:

Installing Cisco AnyConnect Client 3.1 on Fedora 20
This is a short memo about installation of “Cisco AnyConnect Secure Mobility Client 3.1” on my Fedora 20 (KDE) powered laptop. Although Fedora is officially not supported I didn’t find any glitches so far running Cisco vpn client on my laptop.
$ uname -r
3.13.6-200.fc20.x86_64

$ sudo yum install pangox-compat.x86_64  // prerequisite!

$ tar -xvzf anyconnect-predeploy-linux-64-3.1.04072-k9.tar.gz

$ cd anyconnect-3.1.04072/vpn

$ sudo ./vpn_install.sh

// Start Cisco vpn applet with:
$ /opt/cisco/anyconnect/bin/vpnui
Upgrading Oracle Linux 6.4 to 6.5 (plus UEK2 to UEK3)
Steps for upgrading Oracle Linux 6.4 to 6.5 and UEK2 kernel to UEK3:
// Download and replace yum repository file with the new one!
# cd /etc/yum.repos.d
# rm public-yum-ol6.repo
# export http_proxy=proxy.acme.com:80   (optional)
# wget http://public-yum.oracle.com/public-yum-ol6.repo
# nano public-yum-ol6.repo
// find section [ol6_UEKR3_latest] and set Enabled=1
# yum update
# reboot
That’s it. Don’t forget to set Enabled=1 in ol6_UEKR3 section, unless you don’t want to upgrade UEK2 kernel to version UEK3.

You must be logged in to post a comment.