Blog Archives
Upgrade Fedora 19 to 20 (KDE spin)
This is a short note about upgrading my laptop with Fedora 19 (KDE spin) to Fedora 20. On this laptop originally run Fedora 17, which was upgraded with fedup tool to 18 and later on to 19. Since both upgrades in the past were done without a big drama, I decided to repeat the exercise with Fedora 20. If you’re not familiar with fedup I would recommend reading official documentation. Before I started with the upgrade I run “sudo yum update” on Fedora 19 to refresh the system with the latest packages, then I followed the following steps:
1) Update fedup tool
Make sure you have up to date version of fedup installed, version 0.7, which was installed on my Fedora 19 didn’t work due to a known bug.
$ sudo yum --enablerepo=updates-testing update fedup
2) Prepare system for upgrade
$ sudo fedup --network 20
This step will download all the packages and prepare upgrade “transaction”. In my case over 2400 packages were downloaded (it took close to 90 minutes on 50Mbps internet connection, be patient, it can take hours). During download fedup just stopped downloading without
reporting any error, simply returning to the prompt. Fortunately you can repeat the command again and it’ll continue downloading packages from where it stopped. Overall, I repeated fedup command three times before I was notified that I can reboot.
3) Reboot and wait for upgrade to complete
Eventually fedup will ask you to reboot. You’ll see “System upgrade” option in Grub menu that you should select after you reboot. Fedup will also give you a warning if some repository is missing, for example I later on disabled Dropox repository (the first time you run yum you’ll be notified of any repository not (yet) available for Fedora 20).
Another thing you’ll notice while running yum are warnings that some group is missing. Just ignore the warnings, it’s known bug (see section 3.3) in Fedora 20.
$ sudo reboot
Be patient, this will take awhile (another 90 minutes on my laptop with ~2400 packages).
And that’s it, after 90 minutes and last reboot I had working Fedora 20 on my laptop.
4) Quirk
Since Fedora 20 obsoleted old Network Management applet and replaced it with the new one, at first I didn’t even notice that UMTS modem was not showing at all in new Network Manager. After inserting broadband modem USB stick I checked with lsusb if modem is recognized by the kernel and it showed as Globtrotter HSDPA modem. It took me some time to figure out that the reason was disabled ModemManager service, so I fixed the issue with:
$ sudo systemctl start ModemManager.service
$ sudo systemctl enable ModemManager.service
That’s more or less it. So far I didn’t notice anything else that doesn’t work. All I can say is that I’m impressed by fedup capabilities, I’m sure the number of glitches will drop with the maturity of the product.
Gpg4win – file encryption
This is a short note about using GnuPG on Windows 7/2008R2 to encrypt file(s) with symmetric AES encryption. GnuPG is installed on every Linux box that I work with. Fortunately, Windows port is well maintained and for simple batch use it’s enough to install Gpg4win-vanilla package from gpg4win.org. Current version Gpg4win 2.2.21 is shipping GnuPG 2.0.22.
Make sure that you have Gpg4win binaries in PATH (try to run gpg2), if they’re not then add to your path:
SET PATH=C:\Program Files (x86)\GNU\GnuPG;%PATH%
Here is an example of encrypting single file with gpg2:
cmd> gpg2 --batch --yes --passphrase mysecret -z 0 --cipher-algo AES128 --output "D:\TEMP\MYBACKUP.BAK.gpg" --symmetric "D:\ETL\MYBACKUP.BAK"
We’re telling gpg2 that we’re running command in batch mode (–batch), that we don’t want to compress data since input file is already compressed (-z 0) and that we wan’t to use AES128 encryption. With –output switch we’re telling gpg where to write encrypted file – this parameter always precedes command (–symmetric in this case), otherwise we get an error. In current version it’s not possible to specify wildcards for files, so encrypting single file is the only option with –symmetric command.
Decryption is as easy as:
cmd> gpg2 --batch --yes --passphrase mysecret --output "D:\ETL\MYBACKUP.BAK" --decrypt "D:\TEMP\MYBACKUP.BAK.gpg"
Running BitTorrent Sync on Fedora 19 as a service
While setting up BitTorrent Sync (BTSync) on my Fedora 19 workstation at work I thought it’s about time for me to find a recipe on how to setup BTsync as systemd service. So far I start up BTsync manually via simple alias in bashrc, something like this:
alias startbtsync='~/BTSync/btsync --config ~/BTSync/btsync.conf'
Stopping was not as easy, since I had to remember BTsync PID (or grep ps -aux for it) and then use kill command. Thanks to jcollie post on BitTorrent Sync setting service for Btsync was a breeze. But let’s first see how I actually installed BTSync.
Make sure that you pick the latest build from Forum topic that is pinned at the top and is meant to announce the latest build with the proper link. Do NOT download BTSync from the front home page if you wish to work with the latest version with the least amount of bugs.
Installation was as easy as:
$ sudo tar -C /usr/local/bin -xvzf btsync_x64-1.2.71.tar.gz
I also created my “personal” BTsync config file:
$ mkdir ~/BTSync
$ /usr/local/bin/btsync --dump-sample-config > ~/BTSync/btsync.conf
The only thing that I changed was listen address, login name and password:
"webui" :
  {
    "listen" : "127.0.0.1:8888",
    "login" : "admin",
    "password" : "password"
  }
You can setup other options but this is out of the scope of this post. Let’s see now how can we start btsync as a service for one or more users of local workstation.
:: create config file for the service...
$ sudo nano /etc/systemd/system/btsync@.service

[Unit]
Description=BTSync for %i

[Service]
Type=simple
User=%i
ExecStart=/usr/local/bin/btsync --nodaemon --config %h/BTSync/btsync.conf
WorkingDirectory=%h

[Install]
WantedBy=multi-user.target
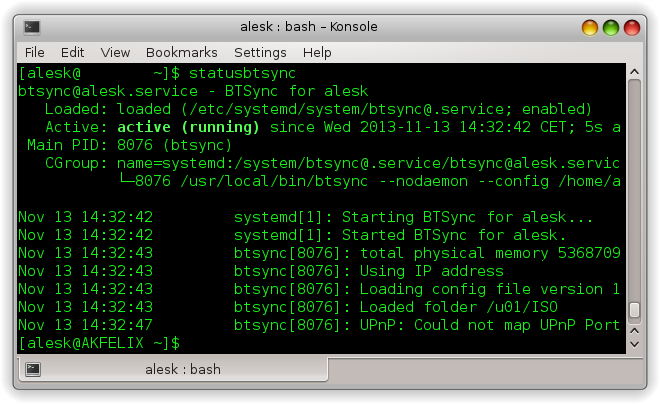
Now, we can start/stop Btsync as a service:
:: Start BTSync
$ sudo systemctl start btsync@alesk.service

:: Stop BTSync
$ sudo systemctl stop btsync@alesk.service

:: Status
$ sudo systemctl status btsync@alesk.service

:: Restart
$ sudo systemctl restart btsync@alesk.service

:: Autostart at boot
$ sudo systemctl enable btsync@alesk.service

:: Disable at boot
$ sudo systemctl disable btsync@alesk.service
Equivalently I added the following aliases in my .bashrc:
alias startbtsync='sudo systemctl start btsync@alesk.service'
alias stopbtsync='sudo systemctl stop btsync@alesk.service'
alias statusbtsync='sudo systemctl status btsync@alesk.service'
alias restartbtsync='sudo systemctl restart btsync@alesk.service'
Getting status of Btsync from command line is now much easier:
Installing Collabnet Subversion Edge Server On Oracle Linux
Here is my note about installation of Collabnet Subversion Edge Serve 4.0.1 on dedicated Oracle Linux 6.4. Subversion Edge Server is revision control repository of all my production DBA/SA scripts.
OS information
$ lsb_release -a
LSB Version:    :base-4.0-amd64:base-4.0-noarch:core-4.0-amd64:core-4.0-noarch:graphics-4.0-amd64:graphics-4.0-noarch:printing-4.0-amd64:printing-4.0-noarch
Distributor ID: OracleServer
Description:    Oracle Linux Server release 6.4
Release:        6.4
Codename:       n/a
Download and install Oracle JDK 1.6
$ pwd
/home/alesk/Downloads/JDK

$ ls
jdk-6u45-linux-x64-rpm.bin

$ chmod a+x jdk-6u45-linux-x64-rpm.bin

$ sudo ./jdk-6u45-linux-x64-rpm.bin

Unpacking...
Checksumming...
Extracting...
UnZipSFX 5.50 of 17 February 2002, by Info-ZIP (Zip-Bugs@lists.wku.edu).
  inflating: jdk-6u45-linux-amd64.rpm
  inflating: sun-javadb-common-10.6.2-1.1.i386.rpm
  inflating: sun-javadb-core-10.6.2-1.1.i386.rpm
  inflating: sun-javadb-client-10.6.2-1.1.i386.rpm
  inflating: sun-javadb-demo-10.6.2-1.1.i386.rpm
  inflating: sun-javadb-docs-10.6.2-1.1.i386.rpm
  inflating: sun-javadb-javadoc-10.6.2-1.1.i386.rpm
Preparing...                ########################################### [100%]
        package jdk-2000:1.6.0_45-fcs.x86_64 is already installed

Done.

// we can delete extracted rpm files afterwards...
$ sudo rm *.rpm

$ ls -l /usr/java/latest
lrwxrwxrwx 1 root root 21 Aug  7 14:38 /usr/java/latest -> /usr/java/jdk1.6.0_45
Prepare target directory
$ sudo mkdir /u01/dbaSVN
$ sudo chown -R alesk:dba /u01/dbaSVN
$ sudo chmod 750 /u01/dbaSVN
Download and install Subversion Edge Server
$ pwd
$ /home/alesk/Downloads/COLLABNET
$ tar -C /u01/dbaSVN -xzf CollabNetSubversionEdge-4.0.1_linux-x86_64.tar.gz
Configure Server Edge to start automatically
$ export JAVA_HOME=/usr/java/default
$ cd /u01/dbaSVN/csvn
$ sudo -E bin/csvn install

Detected RHEL or Fedora:
 Installing the CSVN Console daemon..
Setting RUN_AS_USER to: 'alesk'. Please edit '../data/conf/csvn.conf' if this needs to be adjusted
Setting JAVA_HOME to: '/usr/java/default'. Please edit '../data/conf/csvn.conf' if this needs to be adjusted.
Start the server as user, not root!!
$ /u01/dbaSVN/csvn/bin/csvn start

Starting CSVN Console......
CSVN Console started
Waiting for application to initialize (this may take a minute)............................................................................
WARNING: CSVN Console timed-out waiting for http://localhost:3343/csvn
Login on server with your browser
// use your browser to connect to http://localhost:3343/csvn or
// SSL protcted version: https://localhost:4434/csvn

$ firefox &


Configure Apache Subversion server to start automatically at boot
// before executing the following commands login to Edge Console
// and start the server via GUI, then...
$ cd csvn
$ sudo bin/csvn-httpd install

Detected RHEL or Fedora:
 Installing the Subversion Edge Apache Server daemon..
Open ports 4434 and 18080 on firewall
// I'm using ANSI GUI tool for that...
// Customize -> Forward -> Add (once for each port) -> Close
$ sudo system-firewall-tui
Which “free” is really free?
Recently I lend my RPI to a colleague, model B with 512MB of memory, out of which 64MB is dedicated to GPU unit. He was primarily interested on how much memory is actually available to user space after the OS boots (running fresh Raspbian). I told him to simply run “free -m” and he’ll find out that there should be “plenty” of RAM free for user processes. He replied with some sadness, that he expected a bit more than a mere ~200MB of “free” memory. I knew that the problem is not in the Raspbian distro, but rather in the misleading interpretation of the “free” column. This topic is covered so many times on the net that it is actually hard to find short explanation with some graphical illustration. Here is my version compiled from various sources on the net, the most important one being excellent Bruce Momjian blog from PostgreSQL community.
Let’s start with bare “free -m” output taken on my RPI:
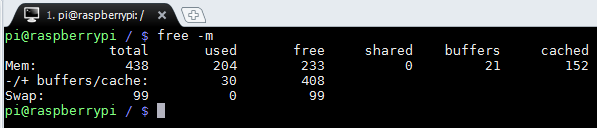
Command returns three lines. The first line “Mem:” shows memory from kernel perspective. Kernel sees 233 MB of “free” memory. This memory is not allocated for anything, it just sits there being ready to be used. It’s this number that my friend interpreted as being the only memory that can be used by user programs and processes.
To help get the proper interpretation of free command I prepared a small illustration showing which values are added together.
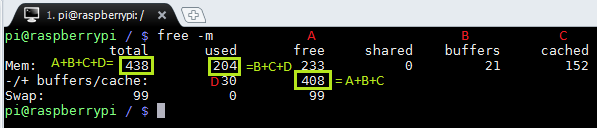
On my RPI 152 MB of memory is dedicated for caching and 21 MB for buffers.
Second line is a look at the memory from process perspective rather than kernel. This is the line of interest. 30MB is used by running processes. With -/+ the “free” is trying to point out that buffer/cache has been removed (-) from “used” column and added (+) to “free” column. Why? Because the second line as I pointed above looks at memory from process perspective and any process can get portion of memory from buffer/cache if needed. So, having 408MB of free memory for user processes on my RPI looks much better than 233MB :-).
The “shared” column shows how much memory is shared by multiply processes and it’s 0 on my RPI, as well as on my other Linux boxes. (Perhaps this column is simply deprecated on recent kernel versions!?)
Also note that kernel reserves for itself at boot some portion of memory, which is not shown as part of the “Total”.

You must be logged in to post a comment.