Category Archives: Linux, PostgreSQL, etc.
Notes about using Linux, MySQL, PostgreSQL and other free software, no matter if it’s open sourced or not.
Installing Collabnet Subversion Edge Server On Oracle Linux
Here is my note about installation of Collabnet Subversion Edge Serve 4.0.1 on dedicated Oracle Linux 6.4. Subversion Edge Server is revision control repository of all my production DBA/SA scripts.
OS information
$ lsb_release -a
LSB Version:    :base-4.0-amd64:base-4.0-noarch:core-4.0-amd64:core-4.0-noarch:graphics-4.0-amd64:graphics-4.0-noarch:printing-4.0-amd64:printing-4.0-noarch
Distributor ID: OracleServer
Description:    Oracle Linux Server release 6.4
Release:        6.4
Codename:       n/a
Download and install Oracle JDK 1.6
$ pwd
/home/alesk/Downloads/JDK

$ ls
jdk-6u45-linux-x64-rpm.bin

$ chmod a+x jdk-6u45-linux-x64-rpm.bin

$ sudo ./jdk-6u45-linux-x64-rpm.bin

Unpacking...
Checksumming...
Extracting...
UnZipSFX 5.50 of 17 February 2002, by Info-ZIP (Zip-Bugs@lists.wku.edu).
  inflating: jdk-6u45-linux-amd64.rpm
  inflating: sun-javadb-common-10.6.2-1.1.i386.rpm
  inflating: sun-javadb-core-10.6.2-1.1.i386.rpm
  inflating: sun-javadb-client-10.6.2-1.1.i386.rpm
  inflating: sun-javadb-demo-10.6.2-1.1.i386.rpm
  inflating: sun-javadb-docs-10.6.2-1.1.i386.rpm
  inflating: sun-javadb-javadoc-10.6.2-1.1.i386.rpm
Preparing...                ########################################### [100%]
        package jdk-2000:1.6.0_45-fcs.x86_64 is already installed

Done.

// we can delete extracted rpm files afterwards...
$ sudo rm *.rpm

$ ls -l /usr/java/latest
lrwxrwxrwx 1 root root 21 Aug  7 14:38 /usr/java/latest -> /usr/java/jdk1.6.0_45
Prepare target directory
$ sudo mkdir /u01/dbaSVN
$ sudo chown -R alesk:dba /u01/dbaSVN
$ sudo chmod 750 /u01/dbaSVN
Download and install Subversion Edge Server
$ pwd
$ /home/alesk/Downloads/COLLABNET
$ tar -C /u01/dbaSVN -xzf CollabNetSubversionEdge-4.0.1_linux-x86_64.tar.gz
Configure Server Edge to start automatically
$ export JAVA_HOME=/usr/java/default
$ cd /u01/dbaSVN/csvn
$ sudo -E bin/csvn install

Detected RHEL or Fedora:
 Installing the CSVN Console daemon..
Setting RUN_AS_USER to: 'alesk'. Please edit '../data/conf/csvn.conf' if this needs to be adjusted
Setting JAVA_HOME to: '/usr/java/default'. Please edit '../data/conf/csvn.conf' if this needs to be adjusted.
Start the server as user, not root!!
$ /u01/dbaSVN/csvn/bin/csvn start

Starting CSVN Console......
CSVN Console started
Waiting for application to initialize (this may take a minute)............................................................................
WARNING: CSVN Console timed-out waiting for http://localhost:3343/csvn
Login on server with your browser
// use your browser to connect to http://localhost:3343/csvn or
// SSL protcted version: https://localhost:4434/csvn

$ firefox &


Configure Apache Subversion server to start automatically at boot
// before executing the following commands login to Edge Console
// and start the server via GUI, then...
$ cd csvn
$ sudo bin/csvn-httpd install

Detected RHEL or Fedora:
 Installing the Subversion Edge Apache Server daemon..
Open ports 4434 and 18080 on firewall
// I'm using ANSI GUI tool for that...
// Customize -> Forward -> Add (once for each port) -> Close
$ sudo system-firewall-tui
PostgreSQL 9.2 installation on OEL 6.4
This is my first note in a series of posts about supporting PostgreSQL on OEL 6.4. Let me start with a fair warning, I’m a total newbie when it comes to PostgreSQL (or PG in short). Don’t have any PG database in production, but this might (and I’m sure it will!) change sooner or later — you know what they say that necessity is the mother of invention. Considering economic downturn that’ll likely last to the end of this decade (or even further)…and you find yourself happy that you have at least some alternative.
Actually, I was always fond to an idea to replace some production “big vendor” databases (in particular Oracle, MS SQL and MySQL) with the most sophisticated free & OSS database on the planet. Sure, PG has some “critical” shortcomings (such as complete lack of proper auditing and even worse, the lack of proper incremental binary backup/recovery tools similar to Oracle RMAN), but the robust, feature-rich, MVCC capable RDBMS is more than enough to handle all sorts of application workload without the need to worry about licenses. Let’s start with installation steps for installation of PG 9.2.4 on OEL 6.4:
Let’s check what we already have on OEL 6.4:
[root@acme ~]# uname -r
2.6.39-400.17.1.el6uek.x86_64

[root@acme ~]# yum info postgresql | grep Version
Version     : 8.4.13
Let’s get rid of PG 8.4.13:
[root@acme ~]# yum erase postgresql

// disable OEL 6.4 default PG repository by adding exclude=postgresql* to
// /etc/yum/pluginconf.d/rhnplugin.conf

[root@acme ~]# nano /etc/yum/pluginconf.d/rhnplugin.conf

[root@acme ~]# cat /etc/yum/pluginconf.d/rhnplugin.conf
[main]
enabled = 0
gpgcheck = 1
exclude=postgresql*
Now we need to install current (PG 9.2) repository:
# rpm -Uvh http://yum.postgresql.org/9.2/redhat/rhel-6.4-x86_64/pgdg-redhat92-9.2-7.noarch.rpm
Now, the installation is as easy as:
# yum install postgresql92-server postgresql92 postgresql92-contrib

....
Dependencies Resolved

===============================================...
 Package                               Arch    ...
===============================================...
Installing:
 postgresql92                          x86_64
 postgresql92-contrib                  x86_64
 postgresql92-server                   x86_64
Installing for dependencies:
 postgresql92-libs                     x86_64
 uuid                                  x86_64

Transaction Summary
===============================================...
Install       5 Package(s)

Total download size: 5.4 M
Installed size: 23 M
Is this ok [y/N]:
...

[root@acme ~]# psql --version
psql (PostgreSQL) 9.2.4
Now, we need to initialize PG cluster and create our first superuser (me;):
// you can't run initdb as root, you must become user under which
// postgres server will run! By default the OS user is postgres.

[root@acme ~]# su - postgres

// cluster initialization. Note that I told initdb my locale, which is
// specific to my country. It's important for further
// creation of databases in the cluster to specify correct locale!!
// Also note, that I could tell initdb where to create data directory, let's // say on some dedicated mount point, such as:
// --pgdata=/u01/pg92/data
// as this is my test database, I don't mind having data files
// in default location (/var/lib/pgsql/9.2/data)

-bash-4.1$ /usr/pgsql-9.2/bin/initdb --locale=sl_SI.UTF8

The files belonging to this database system will be owned by user "postgres".
This user must also own the server process.

The database cluster will be initialized with locale "sl_SI.UTF-8".
The default database encoding has accordingly been set to "UTF8".
The default text search configuration will be set to "english".

fixing permissions on existing directory /var/lib/pgsql/9.2/data ... ok
creating subdirectories ... ok
selecting default max_connections ... 100
selecting default shared_buffers ... 32MB
creating configuration files ... ok
creating template1 database in /var/lib/pgsql/9.2/data/base/1 ... ok
initializing pg_authid ... ok
initializing dependencies ... ok
creating system views ... ok
loading system objects' descriptions ... ok
creating collations ... ok
creating conversions ... ok
creating dictionaries ... ok
setting privileges on built-in objects ... ok
creating information schema ... ok
loading PL/pgSQL server-side language ... ok
vacuuming database template1 ... ok
copying template1 to template0 ... ok
copying template1 to postgres ... ok

WARNING: enabling "trust" authentication for local connections
You can change this by editing pg_hba.conf or using the option -A, or
--auth-local and --auth-host, the next time you run initdb.

Success. You can now start the database server using:

    /usr/pgsql-9.2/bin/postgres -D /var/lib/pgsql/9.2/data
or
    /usr/pgsql-9.2/bin/pg_ctl -D /var/lib/pgsql/9.2/data -l logfile start
Now, we need to setup some basic parameters that’ll allow us to connect to the PG over the network:
//
// setup static IP for PG "listener" (postmaster)
// Obviously make sure that port 5432 is open on firewall!
//

-bash-4.1$ nano /var/lib/pgsql/9.2/data/postgresql.conf

listen_addresses='192.168.1.100'
port = 5432

//
// edit PG permissions in pg_hba.conf
// In my case I limited network access to my 2 workstations.
// md5 encrypted passwords are recommended method for login!
//

-bash-4.1$ nano /var/lib/pgsql/9.2/data/pg_hba.conf

host    all             all             192.168.1.110/24          md5
host    all             all             192.168.1.120/24          md5
Post installation configuration:
// start PG

# service postgresql-9.2 start
Starting postgresql-9.2 service:                           [  OK  ]

// if you want PG to start on boot...

[root@acme ~]# chkconfig | grep postgresql-9.2
postgresql-9.2  0:off   1:off   2:off   3:off   4:off   5:off   6:off

# chkconfig --levels 235 postgresql-9.2 on

// create superuser...

root@acme ~]# su - postgres
-bash-4.1$ psql postgres
psql (9.2.4)
Type "help" for help.

postgres=# CREATE ROLE alesk WITH SUPERUSER LOGIN PASSWORD 'mysecret';
CREATE ROLE
postgres=#
Which “free” is really free?
Recently I lend my RPI to a colleague, model B with 512MB of memory, out of which 64MB is dedicated to GPU unit. He was primarily interested on how much memory is actually available to user space after the OS boots (running fresh Raspbian). I told him to simply run “free -m” and he’ll find out that there should be “plenty” of RAM free for user processes. He replied with some sadness, that he expected a bit more than a mere ~200MB of “free” memory. I knew that the problem is not in the Raspbian distro, but rather in the misleading interpretation of the “free” column. This topic is covered so many times on the net that it is actually hard to find short explanation with some graphical illustration. Here is my version compiled from various sources on the net, the most important one being excellent Bruce Momjian blog from PostgreSQL community.
Let’s start with bare “free -m” output taken on my RPI:
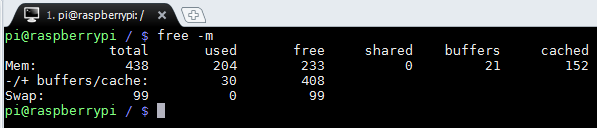
Command returns three lines. The first line “Mem:” shows memory from kernel perspective. Kernel sees 233 MB of “free” memory. This memory is not allocated for anything, it just sits there being ready to be used. It’s this number that my friend interpreted as being the only memory that can be used by user programs and processes.
To help get the proper interpretation of free command I prepared a small illustration showing which values are added together.
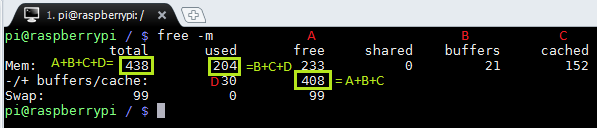
On my RPI 152 MB of memory is dedicated for caching and 21 MB for buffers.
Second line is a look at the memory from process perspective rather than kernel. This is the line of interest. 30MB is used by running processes. With -/+ the “free” is trying to point out that buffer/cache has been removed (-) from “used” column and added (+) to “free” column. Why? Because the second line as I pointed above looks at memory from process perspective and any process can get portion of memory from buffer/cache if needed. So, having 408MB of free memory for user processes on my RPI looks much better than 233MB :-).
The “shared” column shows how much memory is shared by multiply processes and it’s 0 on my RPI, as well as on my other Linux boxes. (Perhaps this column is simply deprecated on recent kernel versions!?)
Also note that kernel reserves for itself at boot some portion of memory, which is not shown as part of the “Total”.
How to patch ESXi 5.0
A short memo about patching ESXi 5.0 without Update Manager:
- Download VMWare patch, in my case I downloaded recently released Update 1 for ESXi 5.0:
http://www.vmware.com/patchmgr/download.portal - upload zip file to ESXi datastore
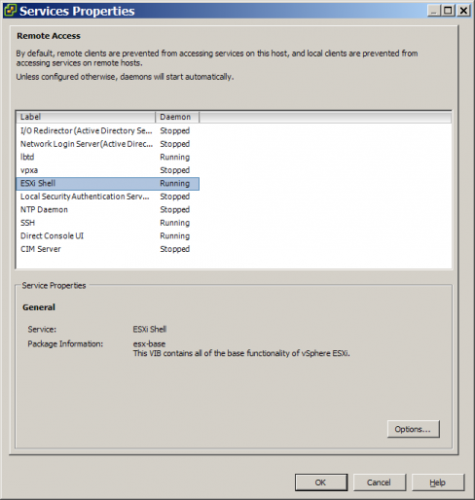
- check that ESXi shell and SSH access is running:
– connect to ESXi with vSphere Client, then open Configuration tab, select Security Profile, open Properties
– check that ESXi shell and SSH are running, if not then turn them on:

- shutdown all VM’s
- use whatever ssh client you prefer to connect to ESXi host as root
- install patch with the esxcli (change path to the patch appropriately):
esxcli software vib install --maintenance-mode --depot /vmfs/volumes/datastore2/ISO/VMWareUpdate1/update-from-esxi5.0-5.0_update01.zip
Note that everything must be on the same line!
- reboot ESXi host
I had a severe network performance problems with base 5.0 release that installation of Update 1 fixed.
Ubuntu Unity on VirtualBox 4.1
Today, I was pleased to see VirtualBox 4.1 release announcement on OTN. New features sounded encouraging, especially the support for Linux Unity and GNOME 3 desktops. So, I decided to give it a try with installation of Ubuntu 11.04 x64 guest. I tried installing guest from ISO image several times and was always blocked at time zone selection. Installer simply hanged.
Google returned numerous reported incidents, I tried out several workarounds, unsuccessfully, until I found someone who said that the only thing that worked for him was when he removed NIC from virtual machine. Bingo! After I completely removed NIC from VM guest machine I was able to finish Ubuntu 11.04 installation (make sure you check 3D support for video!). Then I installed VirtualBox guest additions as usual, then I made a shutdown. I added NIC back to VM guest and I was able to boot and login with Unity interface. I hope this note will spare someone troubleshooting Ubuntu 11.04 installation on VirtualBox 4.1.

You must be logged in to post a comment.