Category Archives: Linux, PostgreSQL, etc.
Notes about using Linux, MySQL, PostgreSQL and other free software, no matter if it’s open sourced or not.
PostgreSQL ODBC driver installation on Linux
After I installed PostgreSQL 9.3 on my Fedora 20 I soon realized that I need PostgreSQL ODBC as well, because I’ll be using Oracle DG4ODBC to connect to PostgreSQL cluster.
I could simply install PostgreSQL ODBC with yum:
$ sudo yum install postgresql-odbc
…and this is perhaps the best option on a long run (in general I prefer using yum as much as possible, even if I sacrifice of not having the latest version of some software), but in this particular case I had a good reason to install the very last version from source.
First download the latest PostgreSQL ODBC driver from:
http://www.postgresql.org/ftp/odbc/versions/src/
$ wget http://ftp.postgresql.org/pub/odbc/versions/src/psqlodbc-09.03.0100.tar.gz
$ tar -xzvf psqlodbc-09.03.0100.tar.gz
$ ./configure --with-libpq=/usr/pgsql-9.3 --disable-openssl
$ make
$ sudo make install
Installation will end with the following instructions (excerpt):
Libraries have been installed in:
   /usr/local/lib

If you ever happen to want to link against installed libraries
in a given directory, LIBDIR, you must either use libtool, and
specify the full pathname of the library, or use the `-LLIBDIR'
flag during linking and do at least one of the following:
   - add LIBDIR to the `LD_LIBRARY_PATH' environment variable
     during execution
   - add LIBDIR to the `LD_RUN_PATH' environment variable
     during linking
   - use the `-Wl,-rpath -Wl,LIBDIR' linker flag
   - have your system administrator add LIBDIR to `/etc/ld.so.conf'

See any operating system documentation about shared libraries for
more information, such as the ld(1) and ld.so(8) manual pages.
A quick check if libraries are indeed there:
$ ls -la /usr/local/lib
total 1960
drwxr-xr-x.  2 root root      44 Dec 29 16:08 .
drwxr-xr-x. 13 root root    4096 Dec 25 22:52 ..
-rwxr-xr-x.  1 root root     971 Dec 29 16:08 psqlodbcw.la
-rwxr-xr-x.  1 root root 1996735 Dec 29 16:08 psqlodbcw.so
Upgrade Fedora 19 to 20 (KDE spin)
This is a short note about upgrading my laptop with Fedora 19 (KDE spin) to Fedora 20. On this laptop originally run Fedora 17, which was upgraded with fedup tool to 18 and later on to 19. Since both upgrades in the past were done without a big drama, I decided to repeat the exercise with Fedora 20. If you’re not familiar with fedup I would recommend reading official documentation. Before I started with the upgrade I run “sudo yum update” on Fedora 19 to refresh the system with the latest packages, then I followed the following steps:
1) Update fedup tool
Make sure you have up to date version of fedup installed, version 0.7, which was installed on my Fedora 19 didn’t work due to a known bug.
$ sudo yum --enablerepo=updates-testing update fedup
2) Prepare system for upgrade
$ sudo fedup --network 20
This step will download all the packages and prepare upgrade “transaction”. In my case over 2400 packages were downloaded (it took close to 90 minutes on 50Mbps internet connection, be patient, it can take hours). During download fedup just stopped downloading without
reporting any error, simply returning to the prompt. Fortunately you can repeat the command again and it’ll continue downloading packages from where it stopped. Overall, I repeated fedup command three times before I was notified that I can reboot.
3) Reboot and wait for upgrade to complete
Eventually fedup will ask you to reboot. You’ll see “System upgrade” option in Grub menu that you should select after you reboot. Fedup will also give you a warning if some repository is missing, for example I later on disabled Dropox repository (the first time you run yum you’ll be notified of any repository not (yet) available for Fedora 20).
Another thing you’ll notice while running yum are warnings that some group is missing. Just ignore the warnings, it’s known bug (see section 3.3) in Fedora 20.
$ sudo reboot
Be patient, this will take awhile (another 90 minutes on my laptop with ~2400 packages).
And that’s it, after 90 minutes and last reboot I had working Fedora 20 on my laptop.
4) Quirk
Since Fedora 20 obsoleted old Network Management applet and replaced it with the new one, at first I didn’t even notice that UMTS modem was not showing at all in new Network Manager. After inserting broadband modem USB stick I checked with lsusb if modem is recognized by the kernel and it showed as Globtrotter HSDPA modem. It took me some time to figure out that the reason was disabled ModemManager service, so I fixed the issue with:
$ sudo systemctl start ModemManager.service
$ sudo systemctl enable ModemManager.service
That’s more or less it. So far I didn’t notice anything else that doesn’t work. All I can say is that I’m impressed by fedup capabilities, I’m sure the number of glitches will drop with the maturity of the product.
PostgreSQL 9.3 – installation on Fedora 19
Here is my short note about installing PostgreSQL 9.3.1 on Fedora 19.
Add Postgresql yum repository to Fedora 19 (x64):
(see http://yum.postgresql.org/repopackages.php for up to date list of repositories)
$ wget http://yum.postgresql.org/9.3/fedora/fedora-19-x86_64/pgdg-fedora93-9.3-1.noarch.rpm
$ sudo rpm -i pgdg-fedora93-9.3-1.noarch.rpm
$ sudo yum update
Install PostgreSQL 9.3:
$ sudo yum install postgresql93
$ sudo yum install postgresql93-docs
$ sudo yum install postgresql93-server
$ sudo yum install postgresql93-contrib
$ sudo yum install postgresql93-devel
$ sudo yum install pgadmin3_93 pgadmin3_93-docs
Which Slovenian locale do I have installed on my system?
$ locale -a | grep sl_SI
sl_SI
sl_SI.iso88592
sl_SI.utf8
Initialize cluster with PGDATA on mount point of my choice:
// enter as a single line!!
$ sudo su - postgres -c '/usr/pgsql-9.3/bin/initdb
   --locale=sl_SI.UTF8' --pgdata=/u01/app/pg93/data


The files belonging to this database system will be owned
by user "postgres".This user must also own the server process.

The database cluster will be initialized with locale "sl_SI.UTF8".
The default database encoding has accordingly been set to "UTF8".
initdb: could not find suitable text search configuration for
locale "sl_SI.UTF8"
The default text search configuration will be set to "simple".

Data page checksums are disabled.

fixing permissions on existing directory /u01/app/pg93/data ... ok
creating subdirectories ... ok
selecting default max_connections ... 100
selecting default shared_buffers ... 128MB
creating configuration files ... ok
creating template1 database in /u01/app/pg93/data/base/1 ... ok
initializing pg_authid ... ok
initializing dependencies ... ok
creating system views ... ok
loading system objects' descriptions ... ok
creating collations ... ok
creating conversions ... ok
creating dictionaries ... ok
setting privileges on built-in objects ... ok
creating information schema ... ok
loading PL/pgSQL server-side language ... ok
vacuuming database template1 ... ok
copying template1 to template0 ... ok
copying template1 to postgres ... ok
syncing data to disk ... ok

WARNING: enabling "trust" authentication for local connections
You can change this by editing pg_hba.conf or using the option -A,
 or --auth-local and --auth-host, the next time you run initdb.

Success. You can now start the database server using:

  /usr/pgsql-9.3/bin/postgres -D /u01/app/pg93/data
or
  /usr/pgsql-9.3/bin/pg_ctl -D /u01/app/pg93/data -l logfile start
Change ip/port on which postgres listens
$ sudo nano /u01/app/pg93/data/postgresql.conf
I uncommented:
listen_addresses = 'localhost'
port = 5432
Start PostgreSQL
$ sudo systemctl start postgresql-9.3.service
Optionally enable PostgreSQL autostart on boot
$ sudo systemctl enable postresql-9.3.service
Now, you can also create shortcut to PG Admin that will point to /usr/pgsql-9.3/bin/pgadmin3.
Running BitTorrent Sync on Fedora 19 as a service
While setting up BitTorrent Sync (BTSync) on my Fedora 19 workstation at work I thought it’s about time for me to find a recipe on how to setup BTsync as systemd service. So far I start up BTsync manually via simple alias in bashrc, something like this:
alias startbtsync='~/BTSync/btsync --config ~/BTSync/btsync.conf'
Stopping was not as easy, since I had to remember BTsync PID (or grep ps -aux for it) and then use kill command. Thanks to jcollie post on BitTorrent Sync setting service for Btsync was a breeze. But let’s first see how I actually installed BTSync.
Make sure that you pick the latest build from Forum topic that is pinned at the top and is meant to announce the latest build with the proper link. Do NOT download BTSync from the front home page if you wish to work with the latest version with the least amount of bugs.
Installation was as easy as:
$ sudo tar -C /usr/local/bin -xvzf btsync_x64-1.2.71.tar.gz
I also created my “personal” BTsync config file:
$ mkdir ~/BTSync
$ /usr/local/bin/btsync --dump-sample-config > ~/BTSync/btsync.conf
The only thing that I changed was listen address, login name and password:
"webui" :
  {
    "listen" : "127.0.0.1:8888",
    "login" : "admin",
    "password" : "password"
  }
You can setup other options but this is out of the scope of this post. Let’s see now how can we start btsync as a service for one or more users of local workstation.
:: create config file for the service...
$ sudo nano /etc/systemd/system/btsync@.service

[Unit]
Description=BTSync for %i

[Service]
Type=simple
User=%i
ExecStart=/usr/local/bin/btsync --nodaemon --config %h/BTSync/btsync.conf
WorkingDirectory=%h

[Install]
WantedBy=multi-user.target
Now, we can start/stop Btsync as a service:
:: Start BTSync
$ sudo systemctl start btsync@alesk.service

:: Stop BTSync
$ sudo systemctl stop btsync@alesk.service

:: Status
$ sudo systemctl status btsync@alesk.service

:: Restart
$ sudo systemctl restart btsync@alesk.service

:: Autostart at boot
$ sudo systemctl enable btsync@alesk.service

:: Disable at boot
$ sudo systemctl disable btsync@alesk.service
Equivalently I added the following aliases in my .bashrc:
alias startbtsync='sudo systemctl start btsync@alesk.service'
alias stopbtsync='sudo systemctl stop btsync@alesk.service'
alias statusbtsync='sudo systemctl status btsync@alesk.service'
alias restartbtsync='sudo systemctl restart btsync@alesk.service'
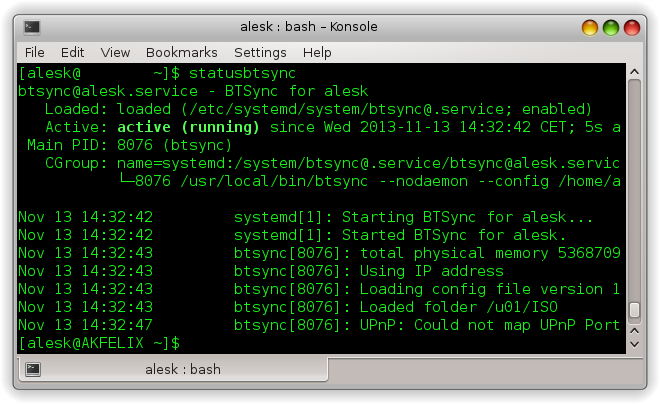
Getting status of Btsync from command line is now much easier:
Securing PostgreSQL
No doubt that PostgreSQL (PG) privilege system is very flexible one but at the same time, due to the architectural differences between PG and Oracle, it is also substantially different from patterns used in Oracle. Considering myself as a total PostgreSQL newbie, I thought it would be a good start for me to write down some basic PG security approaches (patterns?) in a form of a blog article.
Of course, since I’m a PG newbie, don’t take anything you read here for granted and please, don’t blindly follow my recommendations without trying this on your own — I’m sure some things could be done differently, more efficient or more secure. If you think I’m dead wrong on something I said here, please contact us and I’ll certainly correct the content with proper attribution.
Here is a business scenario that I’ll be referencing during this short “how-to” tutorial.
Acme Ltd. was an Oracle customer for many years. Recent economic downturn caused a serious cut in yearly IT budged expenses. Top management decided to deploy all newly build applications on open and free software stack. PostgreSQL was first and only choice for database layer by DBA team, developers where less enthusiastic, so they asked DBA team to prepare some proof of concept working environment, where they can try out PG features and test security framework.
Basic requirements are:
- separate development, test and production databases
- separate core application objects from reporting and ETL processes
- separate project roles (dba, developer, tester, web application)
- make as easy as possible to control who can connect to which particular database
- allow developers to work together on same application (schemas) in a way that they’re used to work in Oracle
- limit the chance to exploit superuser privileges over the network
- limit user privileges to the minimal set that they need for work to be done
- limit web application access to database from approved IP’s
Separating development, test and production databases
We decided to create three databases in PG cluster: PG1 (dev), PG2 (test), PG3 (prod)
As superuser:

-- PG1 - development database
CREATE DATABASE pg1
  WITH OWNER = postgres
       ENCODING = 'UTF8'
       TABLESPACE = pg_default
       LC_COLLATE = 'sl_SI.UTF8'
       LC_CTYPE = 'sl_SI.UTF8'
       CONNECTION LIMIT = 20;

REVOKE CONNECT, TEMPORARY ON DATABASE pg1 FROM public;

-- PG3 - test database

CREATE DATABASE pg2
  WITH OWNER = postgres
       ENCODING = 'UTF8'
       TABLESPACE = pg_default
       LC_COLLATE = 'sl_SI.UTF8'
       LC_CTYPE = 'sl_SI.UTF8'
       CONNECTION LIMIT = 50;

REVOKE CONNECT, TEMPORARY ON DATABASE pg2 FROM public;

-- PG3 - production database

CREATE DATABASE pg3
  WITH OWNER = postgres
       ENCODING = 'UTF8'
       TABLESPACE = pg_default
       LC_COLLATE = 'sl_SI.UTF8'
       LC_CTYPE = 'sl_SI.UTF8'
       CONNECTION LIMIT = 50;

REVOKE CONNECT, TEMPORARY ON DATABASE pg3 FROM public;
We think that default PG privileges are unreasonably generous on public schema.
So immediately after db creation we revoked privileges granted to PUBLIC schema. As superuser connect to each newly created database and revoke privileges:
$ psql -U alesk pg1

pg1=# REVOKE ALL ON SCHEMA public FROM public;

$ psql -U alesk pg2

pg2=# REVOKE ALL ON SCHEMA public FROM public;

$ psql -U alesk pg3

pg3=# REVOKE ALL ON SCHEMA public FROM public;
Separating core application objects from reporting and ETL processes
Schemas are perfectly suitable to achieve this goal. In each database we created three schemas, ACME (core application), ACMEREP (reporting), ACMELOAD (ETL stuff). Note that we deliberately specified postgres superuser as schema owner – for now – we’ll change this later on. We also created single demo table in each schema, solely for testing purposes.
Connect as superuser to each database (pg1, pg2, pg3) and run:
create schema acme authorization postgres;
create schema acmerep authorization postgres;
create schema acmeload authorization postgres;

create table acme.t1 (i int);
insert into acme.t1 values (42);

create table acmerep.t1 (i int);
insert into acmerep.t1 values (42);

create table acmeload.t1 (i int);
insert into acmeload.t1 values (42);
Manage roles and connections
In PG we have two kind of roles, login and nologin roles. Roles are global across PG cluster and thus shared by all databases in the cluster. Think about login roles as being users and nologin roles as being groups. With users we try to identify people (and/or applications) accessing our database and with groups we share permissions between people. It was not always like that, in PG versions before 8.1 there were two strictly separated entities; USER and GROUP, that’s why some old statements still work in PG 9.x, but it’s better to stick with the new terminology and syntax.
In this section we’ll create both kind of roles. Before PG allows user to connect to the database it checks pg_hba.conf file if there is a rule that approves user connection or not. PG is always processing rules in pg_hba.conf from top to bottom, the moment it finds satisfying rule it stops. So, it’s very important to carefully edit this file, because you can easily open the door to someone you don’t want to. When I first read about the concept behind pg_hba.conf I said, ok, it’s a simple and flexible way of controlling who can access the databases in PG cluster, but at the same time it’s also cumbersome and error prone to rely on DBA to properly edit configuration file for each new user account. There must be a better way and hopefully there is — we can manage connections to PG with standard permissions on database (granting “connect” role), pretty much like we’re used on Oracle.
Let’s create some roles. Connect to the PG as superuser…
For each database (pg1, pg2, pg3) create “special” group role that will control who can connect to particular database. We’ll add these roles to pg_hba.conf later on.
create role pg1_connect nologin;
create role pg2_connect nologin;
create role pg3_connect nologin;

grant connect on database pg1 to pg1_connect;
grant connect on database pg2 to pg2_connect;
grant connect on database pg3 to pg3_connect;
--
Now we should edit pg_hba.conf. Personally, I want to edit this file just once per database, not once for each user. Ideally, this file should not contain any users (login roles) at all, but we’ll make an exception when creating rule for webapp login and this is fine. As in Oracle I would like to administer rights to connect to the database exclusively from psql, granting/revoking “connect” role.
# TYPE  DATABASE        USER            ADDRESS               METHOD
host	pg1             +pg1_connect    0.0.0.0/0               md5
host    pg2             +pg2_connect    0.0.0.0/0               md5
host    pg3             +pg3_connect    0.0.0.0/0               md5
--
The plus sign in front of pg1_connect role is the crucial trick that I was not familiar with until I read blog post by Shaun Thomas [3]. It means that rule will match *any* role that is *directly* OR *indirectly* member of this role. Without + the rule would match only that specific role.
Now, we need to create some login roles for developers. We decided that we’ll keep Oracle kind of schema pattern, where application is installed in dedicated application schema. Developers who work together will also share same login role that’ll give them access to particular schema.
Let’s first create login roles according to our application schema’s (ACME, ACMEREP, ACMELOAD), as super user login to PG cluster:
create role acme login password 'acmepwd';
grant pg1_connect to acme;
grant pg2_connect to acme;

create role acmerep login password 'acmereppwd';
grant pg1_connect to acmerep;
grant pg2_connect to acmerep;

create role acmeload login password 'acmeloadpwd';
grant pg1_connect to acmeload;
grant pg2_connect to acmerep;
Note that by default we allowed developers to connect to development and test database by granting them both connect roles (pg1_connect, pg2_connect). Developers are not allowed to connect to production database pg3.
Next, we need to transfer ownership of applications schema’s from postgres to newly created login roles. Connect as superuser to each database (pg1, pg2, pg3) and execute:
alter schema acme owner to acme;
alter schema acmerep owner to acmerep;
alter schema acmeload owner to acmeload;
Since we already created test table t1 in each schema that is owned by postgres, we would like to change table ownership on t1 tables from postgres to application schema’s login roles as well. We can issue individual SQL statement:
alter table acme.t1 owner to acme;
…or better yet, we can generate statements from information schema meta data:
select 'ALTER TABLE '||table_schema||'.'||table_name
 ||' OWNER TO '|| CASE when table_schema = 'acme' then 'acme'
                       when table_schema = 'acmerep' then 'acmerep'
                       when table_schema = 'acmeload' then 'acmeload'
                       else table_schema
                   END ||';'
from information_schema.tables
where table_schema in('acme','acmerep','acmeload');
which will result in:
ALTER TABLE acmeload.t1 OWNER TO acmeload;
ALTER TABLE acmerep.t1 OWNER TO acmerep;
ALTER TABLE acme.t1 OWNER TO acme;
At this point we have:
- three databases in PG cluster, separating development from test and production environment
- we removed default privileges on database from public as well as those granted on public schema
- in each database we created three schema’s to separate three distinct application modules
- we deliberately created login roles with the same name as application schema’s to resemble Oracle pattern of work for developers
- we transferred ownership on application schema’s to login roles dedicated to developers working together on particular application module (acme, acmerep or acmeload)
- we’re controlling connection privileges to the databases with pg_connect roles, rather than by editing pg_hba.conf file
So far so good, but there are still things to configure. We need to create dba account that’ll have enough privileges to manage all three databases at database level. Web application will also need special (limited) account with privileges on acme and acmerep schemas on PG2 and PG3 databases. Access from application server should be restricted to specific IP’s.
Another thing that needs to be done is limiting superusers connectivity. In production environment it’s a crucial protection step to disallow superuser’s to connect to PG cluster over the network — if superuser needs to do something on PG cluster she/he must first connect to server either with ssh or locally.
Setup roles for DBA and web application
Let’s begin with application “dba” login role. We have user Jack who is responsible for managing databases pg1-pg3.
As DBA he sometimes needs to create his own procedures, tables etc., that’s why he also needs his own schema. First login to PG cluster as superuser and execute:
create role pg1_dba nologin;
create role pg2_dba nologin;
create role pg3_dba nologin;

create role jack with login password 'jackpwd';
alter role jack set search_path to jack,public;

grant pg1_connect, pg2_connect, pg3_connect to jack;

-- give Jack ownership rights on application schema's
-- by granting him roles that're owners of those schema's!
grant acme, acmerep, acmeload to jack;

-- connect to each database (pg1, pg2, pg3) as superuser and run
create schema jack authorization jack;
Notice that we granted three existing application login roles (acme, acmerep and acmeload)
to Jack, thus allowing him to manage all objects that’ll be created by developers in application schemas using those three login roles. He can not create new databases and/or roles – these privileges remain in the domain of superusers. Finally, he has his own schema to keep his own objects away from the others.
Production application server is allowed to connect to test (pg2) and production (pg3) databases from specific IP only. Application uses data from schema acme with certain read/write privileges on schema acme and read-only privileges on schema acmerep. Total number of connections for webapp user should be limited to 20. Connect as superuser to PG cluster and run:
create role webapp login password 'webapppwd' connection limit 20;
grant pg2_connect, pg3_connect to webapp;

create role pg2_acme_edit nologin;
create role pg2_acmerep_read nologin;

create role pg3_acme_edit nologin;
create role pg3_acmerep_read nologin;

grant pg2_acme_edit, pg2_acmerep_read to webapp;
grant pg3_acme_edit, pg3_acmerep_read to webapp;
--
At this point webapp user has been granted roles with necessary privileges on objects in both schema’s, acme and acmerep. For now it’s just a single table, but additional privileges will be granted to edit/read roles by developers later. However, before webapp login role can access data in both schemas it needs one additional privilege: USAGE on both schema’s. We decided to create separate role just for this privilege. This’ll allows us to easily remove access to all objects in application schema’s with single revoke statement.
-- as superuser create nologin usage role in pg2 and pg3,
-- assuming that we

create role pg2_webapp_usage nologin;
create role pg3_webapp_usage nologin;

\c pg2

grant usage on schema acme to pg2_webapp_usage;
grant usage on schema acmerep to pg2_webapp_usage;

\c pg3

grant usage on schema acme to pg3_webapp_usage;
grant usage on schema acmerep to pg3_webapp_usage;
--
To allow webapp login role to access application schema’s on test and production databases:
grant pg2_webapp_usage to webapp;

grant pg3_webapp_usage to webapp;
--
Last but not least, we want to control from which IP’s can webapp user connect to the database. At the same time, we’ll configure pg_hba.conf in a way that’ll prevent superusers to connect to PG cluster from network.
Let’s start with the superuser. We’ll use the same trick as before, combining PG role with (+) entry in the pg_hba.conf. Connect to PG cluster with superuser and create special role wheel.
create role wheel nologin;

-- grant this role to every superuser
grant wheel to alesk, postgres;
…then all that we need is to allow local connection for wheel members and prevent connections from network by editing pg_hba.conf file:
# TYPE  DATABASE        USER           ADDRESS              METHOD
local   all             +wheel                                md5
host    all             +wheel         0.0.0.0/0              reject
Securing connection by webapp user is done in a similar way, with the help from pg_hba.conf.
host    pg1             webapp          10.10.10.11/24            md5
host    pg2,pg3         webapp          10.10.10.10/24            md5
host    all             webapp          0.0.0.0/0                 reject
We’re allowing connection to pg2,pg3 databases with user webapp only from 10.10.10.10/24. Webapp can also connect to pg1 from 10.10.10.11 which is application server dedicated to development. From all other IP’s connection attempts will be rejected.
Content of pg_hba.conf file on my laptop is shown in the following picture, where I grouped together different sections.
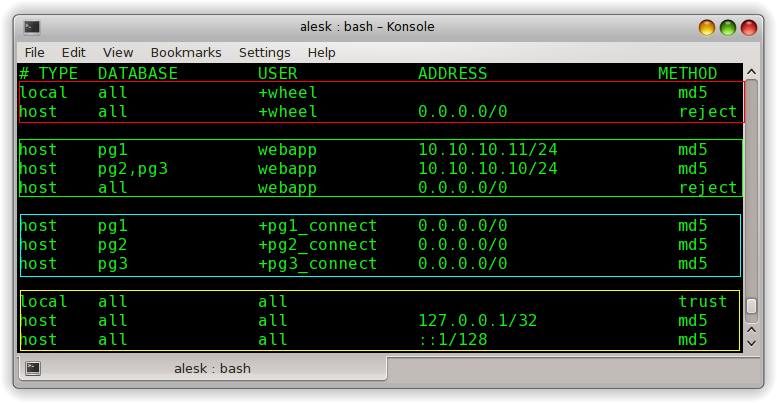
Note that the line using “trust” is there only for my own convenience when playing with PG on my laptop. This line should be removed from config file on production PG cluster!
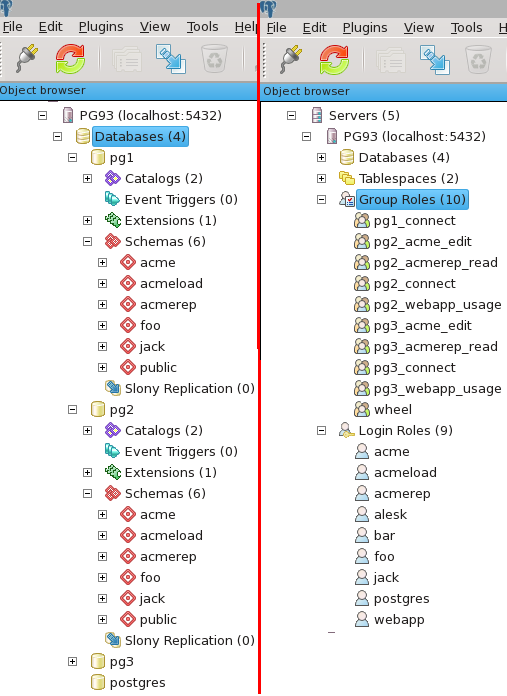
I’ll end my “article” with pictures showing the end result of above steps on my laptop in pgAdmin:
To recap:
- We have three separate databases for development, test and production with restricted permissions on schema public.
- In each database we created three schema’s dedicated to application.
- Each application schema is owned by login role with the same name. This login role is shared by all developers working on that particular module/schema.
- Application DBA for AcmeApp has rights on all three application schema’s, but otherwise lacks any superuser rights. Oracle variant of DBA (SYSDBA) is reserved for superusers.
- Superusers can’t work over the network, they can login locally only.
- We’re managing rights to connect to the particular database with database “connect” roles, rather than by tweaking pg_hba.conf for each user.
- Web application server can connect to PG cluster from restricted IP’s only.
There’re still things to be done to enhance PG cluster security, but that’s something I’ll leave for some post in the future — after all, I’m still in the early learning stage…:)
References:

You must be logged in to post a comment.