Category Archives: Linux, PostgreSQL, etc.
Notes about using Linux, MySQL, PostgreSQL and other free software, no matter if it’s open sourced or not.
ASRock mini – Part 5.
Here are my notes about setting up python programming environment on my ASRock mini running Ubuntu 10.04 (32-bit), covering the latest and greatest Python 3.2, plus some third party libraries that I need for my work.
Fifth note in this series will cover:
- how to install python 3.2.0 (32-bit) from source in alternate location
- how to install cx_Oracle 5.0.4 from source
- how to install PyYAML 3.09 from source
- how to install lxml 2.3 from source
- how to install PyQt 4.8.3 from source
PYTHON 3.2
Soon after my first failed attempt to compile python 3.2 on my Ubuntu 10.04 workstation, I realized that tk-dev package was missing on my system, causing IDLE to report the error:
IDLE can’t import Tkinter. Your Python may not be configured for Tk.
$ sudo apt-get install tk-dev
Then I proceeded with the python build:
$ mkdir python

$ cd python

$ mkdir python32

$ cd python32

$ wget http://www.python.org/ftp/python/3.2/Python-3.2.tgz

$ tar xvzf Python-3.2.tgz

$ cd Python-3.2

$ ./configure --prefix=/opt/python3.2

$ make

$ sudo make install

$ sudo ln -s /opt/python3.2/bin/python3.2 /usr/bin/python32

$ sudo ln -s /opt/python3.2/bin/idle3.2 /usr/bin/idle-python3.2
Now you can create launcher on your desktop that’ll point to /usr/bin/idle-python3.2.
THIRD PARTY LIBRARIES
cx_Oracle 5.0.4
Note! I’m using “full” Oracle 11g R2 client, not an instant client! For instant client refer to the BUILD document that ships with cx_Oracle library.
-- Download tar with the source from http://cx-oracle.sourceforge.net/

-- to ~/python/cx_Oracle, then proceed:

$ export ORACLE_HOME=/oracle/ora11

$ export LD_LIBRARY_PATH=/oracle/ora11/lib

$ cd ~/python/cx_Oracle

$ tar xvzf cx_Oracle-5.0.4.tar.gz

$ cd cx_Oracle-5.0.4

$ python32 setup.py build

$ sudo su - root

# export ORACLE_HOME=/oracle/ora11

# export LD_LIBRARY_PATH=/oracle/ora11/lib

# cd /home/alesk/python/cx_Oracle/cx_Oracle-5.0.4

# python32 setup.py install

# exit
Notice how I “sudo su – root” to root and set ORACLE_HOME and LD_LIBRARY_PATH variables, otherwise install will fail if you simply “sudo python32 setup.py install”, since root (usually) doesn’t have profile with environment variables related to Oracle installation.
Make a short test:
$ python32
Python 3.2 (r32:88445, Mar 16 2011, 19:42:11)
[GCC 4.4.3] on linux2
Type "help", "copyright", "credits" or "license" for more information.
>>> import cx_Oracle
>>> print(cx_Oracle.version)
5.0.4
>>> print(cx_Oracle.clientversion())
(11, 2, 0, 2, 0)
PyYAML 3.09
$ cd ~/python/PyYAML

$ wget http://pyyaml.org/download/pyyaml/PyYAML-3.09.tar.gz

$ tar xvzf PyYAML-3.09.tar.gz

$ cd PyYAML-3.09

$ sudo python32 setup.py install

--

-- test PyYAML installation...

--

$ python32 setup.py test
lxml 2.3
Module lxml depends on libxml2 and libxslt libraries that could be installed from apt repository, but after reading what are the recommended versions of libraries in lxml documentation, I decided to install the latest versions ob both libraries from source.
$ cd ~/python/lxml

$ wget ftp://xmlsoft.org/libxml2/libxml2-2.7.8.tar.gz

$ wget ftp://xmlsoft.org/libxml2/libxslt-1.1.26.tar.gz

$ wget http://pypi.python.org/packages/source/l/lxml/lxml-2.3.tar.gz
$ tar xvzf libxml2-2.7.8.tar.gz

$ cd libxml2-2.7.8

$ ./configure

$ make

$ sudo make install
$ cd ..

$ tar xvzf libxslt-1.1.26.tar.gz

$ cd libxslt-1.1.26

$ ./configure

$ make

$ sudo make install
Finally, we can install lxml:
$ tar xvzf lxml-2.3.tar.gz

$ cd lxml-2.3

$ python32 setup.py build

$ sudo python32 setup.py install
After installation run a test by printing versions of lxml, libxml2 and libxslt:
$ python32
>> from lxml import etree
>> print(etree.LXML_VERSION)
>> print(etree.LIBXML_VERSION)
>> print(etree.LIBXSLT_VERSION)
PyQt 4.8.3
I followed instructions that you can find at:
http://www.riverbankcomputing.co.uk/static/Docs/PyQt4/html/installation.html
Note:
After my first failed attempt to compile PyQt, I realized that I need to install libxext-dev to avoid error:
...

...

/usr/bin/ld: cannot find -lXext

collect2: ld returned 1 exit status

make[1]: *** [QtHelp.so] Error 1

make[1]: Leaving directory `/home/alesk/python/PyQt/PyQt-x11-gpl-4.8.3/QtHelp'

make: *** [all] Error 2

...
You can install the package with:
$ sudo apt-get install libxext-dev
Note: sip module is a prerequisite before we can configure & build PyQt!
$ cd PyQt

$ wget http://www.riverbankcomputing.com/static/Downloads/sip4/sip-4.12.1.tar.gz

$ cd sip-4.12.1

$ python32 configure.py

$ make

$ sudo make install

$ cd ..
Now, we can download, build and install PyQt:
$ wget http://www.riverbankcomputing.com/static/Downloads/PyQt4/PyQt-x11-gpl-4.8.3.tar.gz

$ tar xvzf PyQt-x11-gpl-4.8.3.tar.gz

$ cd PyQt-x11-gpl-4.8.3

$ python32 configure.py
Do you accept the terms of the license? yes
$ make
$ sudo make install
Make s simple test of PyQt installation…
$ python32
>> from PyQt4.QtCore import QT_VERSION_STR
>> print(QT_VERSION_STR)
Android SDK on Ubuntu 10.04
It was about time to install Android SDK on my ASROCK workstation powered by Ubuntu 10.04. Right know, I’m using Dalvik Debug Monitor from Android SDK to take screenshot from my HTC Hero, but on the long run I think I’ll need the SDK if I’ll ever want to write and run some python script on Android using excellent SL4A (Scripting Layer for Android).
PART 1 – enabling ddms
Make sure Java jdk is in the path (if you don’t have java on your machine, install it with sudo apt-get openjdk-6-jdk).
I used JDK that I installed for Oracle SQLDeveloper.
$ export PATH=/oracle/jdk1.6.0_21/bin:$PATH
$ mkdir android_sdk
$ cd android_sdk
$ pwd
/home/alesk/android_sdk
Download and install Android SDK:
$ wget http://dl.google.com/android/android-sdk_r10-linux_x86.tgz
$ tar zxvf android-sdk_r10-linux_x86.tgz
$ cd android-sdk-linux_x86/
If you wish to run ddms (Dalvik Debug monitor) you’ll have to install “Android SDK Platform-tools”.
Launch android GUI and install package:
$ cd tools
$ ./android
Open Available packages and select “Android SDK Platform-tools, Revision 3”:

After installation completes, make sure that you run adb as root (by default adb starts as user).
$ cd /home/alesk/android_sdk/android-sdk-linux_x86/platform-tools
$ ./adb kill-server
$ sudo ./adb start-server
[sudo] password for alesk:
* daemon not running. starting it now on port 5037 *
* daemon started successfully *
Check if you can see your phone as a device.
$ ./adb devices
List of devices attached
HT97RL904617	device
Now you can start ddms (Dalvik Debug Monitor).
$ cd /home/alesk/android_sdk/android-sdk-linux_x86/tools
$ ./ddms
PART 2 – Preparing Android Emulator
$ cd android_sdk/tools
$ ./android
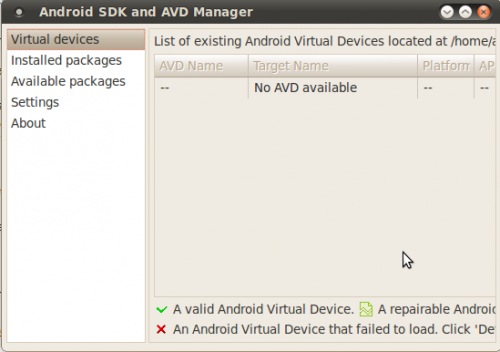
As you can see, there are no Virtual Devices yet. Let’s create one, but before we start we need to download and install API’s for target device.
Select “Installed packages”, then button “Update all”. From the list I selected Accept All. Be patient, it’ll take quite some time for download to finish (it took approx. 2 hours on 1Mbps “broadband”).

After downloads complete we can start creating Virtual Android device that’ll serve as emulator.
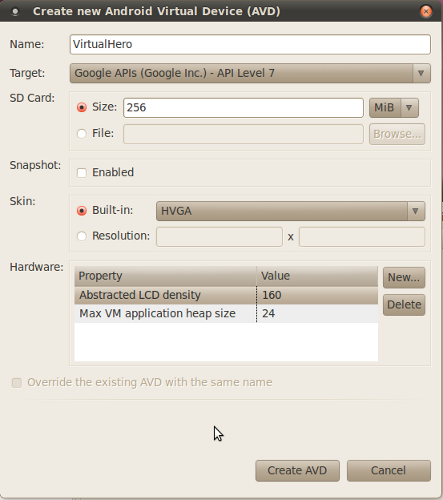
Click button “New”, then fill necessary information about your target device. Since I own HTC Hero with Android OS 2.1 I created virtual devices as shown on the picture:
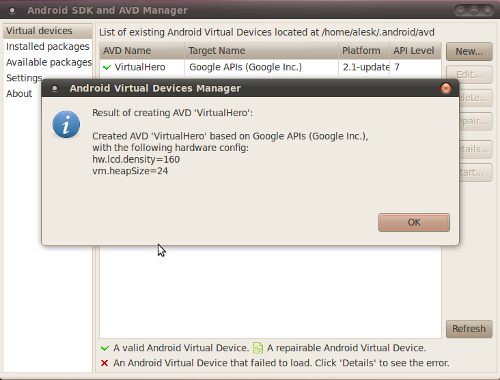
After you click on “Create AVD”, you’ll see newly created virtual device among Virtual devices section.
Now, we can start Virtual device by selecting device from the list and clicking on Start button, then on Launch button (leaving everything on the menu in default state).
It can take several minutes for Virtual Device to “boot”, in short, don’t expect from emulator the same speed as if you’re using “real” phone (on my ASROCK, with dual core Atom processor, it took approx. five minutes to boot the virtual phone device. In general, everything is extremely slow compared with a real Android phone!). Eventually, you should see android home screen similar to this one:
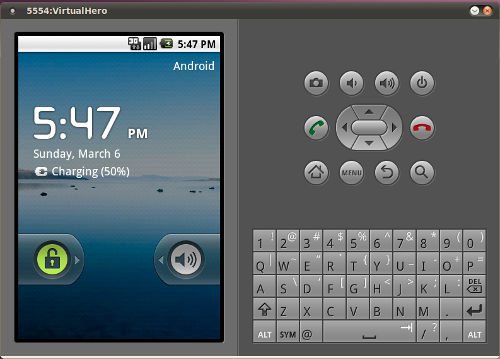
Use mouse to unlock your “phone”, by dragging lock to the right. Mouse click replaces a “tap” on real phone.

I tested my newly created virtual “HTC Hero” device by installing Python for Android and SL4A according to this article..
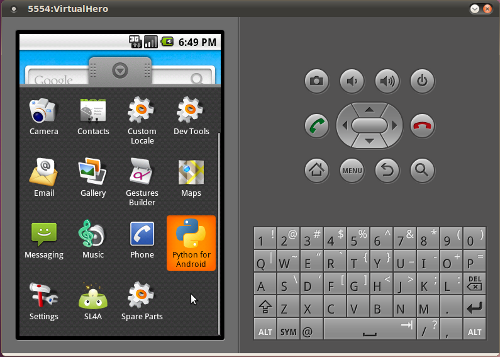
If you “tap” on SL4A you should see python demo scripts.
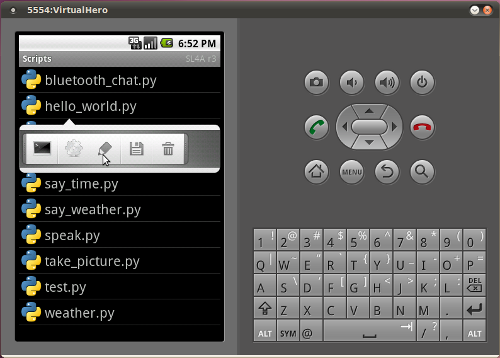
Let’s say that we wrote some python script (hello_dbaportal.py) that we want to upload to virtual device, it’s as easy as:
$ cd android_sdk/platform-tools
$ ./adb push hello_dbaportal.py /sdcard/sl4a/scripts
* daemon not running. starting it now on port 5037 *
* daemon started successfully *
1 KB/s (80 bytes in 0.077s)
If you check emulator, you’ll find python script hello_dbaportal.py, from where you can run the code…
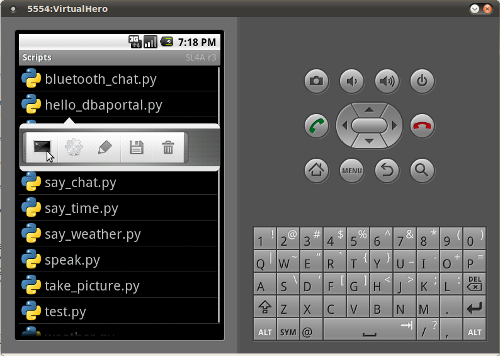
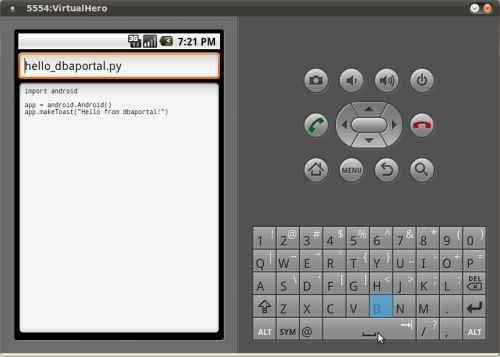
or, if you’re keen to fiddle with the script inside emulator, you can also edit the script…
How to install and use vpnc to connect to Cisco VPN concentrator
Even though I managed to install Cisco VPN client 4.8 on my Ubuntu (Lucid Lynx) workstation, I was not successful at troubleshooting the connection attempt to our corporate Cisco VPN concentrator. Each attempt of mine to establish VPN connection, ended in greeting with the error message:
Secure VPN Connection terminated locally by the Client
Reason: Failed to establish a VPN connection.
There are no new notification messages at this time.
I almost gave up my hopes to use Ubuntu for VPN, fortunately, I recently met an Oracle DBA (Igor@3Gen), who told me that he’s is successfully using vpnc to connect to the same Cisco VPN concentrator as I am.
He was kind (thanks Igor!) to share his notes on the subject. This is my resume of steps that I followed to install and configure vpnc (of course, some technical details are obfuscated).
Step 1) Install vpnc and Gnome GUI plugin for network manager
--
-- Install vpnc
--
$ sudo apt-get install vpnc
$ sudo apt-get install network-manager-vpnc
$ sudo apt-get install network-manager-vpnc-gnome
Step 2) Extract group password from Cisco client pcf file
Until now, I was using Cisco VPN client on Windows 7, that was packed and delivered to me by our corporate VPN support team. My Cisco VPN client (v5.0.02.0090) already included the necessary profiles (*.pcf files) with the configuration data. Profile configuration files are usually located in C:\Program Files\Cisco Systems\VPN Client\Profiles.
If you open your pcf file you’ll find (among other data) encrypted group password in the field !enc_GroupPwd. This is a pre-shared secret that we first need to decrypt it and then use it in our vpnc configuration file. Hopefully, this is not hard with the tools that exists on the net.
--
-- 2.1 Prepare working directory
--
$ mkdir vpnc
$ cd vpnc
--
-- 2.2 Install cisco-decrypt from source file
--
$ wget http://www.unix-ag.uni-kl.de/~massar/soft/cisco-decrypt.c
$ sudo apt-get install libgcrypt11-dev
$ export PATH=.:$PATH
$ gcc -Wall -o cisco-decrypt cisco-decrypt.c $(libgcrypt-config --libs --cflags)
--
-- 2.3 Check that cisco-decryp was built
--
alesk@dbaportal:~/vpnc$ ls -l cisco-decrypt
-rwxr-xr-x 1 alesk dba 7850 2010-12-04 18:04 cisco-decrypt
--
-- 2.4 Download pcf2vpnc
--
$ wget http://svn.unix-ag.uni-kl.de/vpnc/trunk/pcf2vpnc
$ chmod +x pcf2vpnc
--
-- 2.5 Copy your .pcf file from Windows client to our vpnc working directory
-- on ubuntu (let's say that our pcf file is called acme-vpn.pcf)
--  and run pcf2vpnc against our pcf file.
--
$ ./pcf2vpnc acme-vpn.pcf > acme-vpnc.conf
At this stage we have decrypted group password in acme-vpnc.conf.
[Note: there is a site that can decrypt Cisco group password for you. Personally, I prefer relying on my own tools, that’s why I compiled my own decryption tool.]
Step 3) Setup vpnc configuration file (/etc/vpnc/ACME-vpn.conf)
Use your favorite editor to create your vpnc configuration file…
$ sudo nano /etc/vpnc/ACME-vpn.conf
Then add the following lines:
IPSec gateway nnn.nnn.nnn.nnn
IPSec ID ACMEID
IPSec secret  fkvmdn34&3ldcmvnsbj#4%gB
Xauth username alesk@pda-acme
Where:
- nnn.nnn.nnn.nnn — is IP address of VPN gateway (!Host variable in pcf file). It’s recommended that you use IP instead of fully qualified domain name for the gateway, to avoid problem of resolving DNS to IP!
- IPSec ID — is group name (!GroupName variable in pcf file)
- IPSec secret — is group password, originally encrypted in pcf file as !enc_GroupPwd variable. You must enter decrypted version of the password that you’ll find in vpnc configuration file generated in step 2.5
- Xauth username — username for authentication (Username variable in pcf file)
Step 3) Modify firewall rules to allow VPN connection
Use your favorite editor to edit firestarter user-pre file to add some iptables rules:
$ sudo nano /etc/firestarter/user-pre
Add the following lines (replace nnn.nnn.nnn.nnn with the Cisco VPN gateway IP):
iptables -A INPUT -j ACCEPT -s nnn.nnn.nnn.nnn -p esp
iptables -A INPUT -j ACCEPT -s nnn.nnn.nnn.nnn -p udp -m multiport –sports isakmp,10000
iptables -A INPUT -j ACCEPT -i tun+
iptables -A OUTPUT -j ACCEPT -d nnn.nnn.nnn.nnn -p esp
iptables -A OUTPUT -j ACCEPT -d nnn.nnn.nnn.nnn -p udp -m multiport –dports isakmp,10000
iptables -A OUTPUT -j ACCEPT -o tun+
Restart your firewall:
alesk@dbaportal:~$ sudo service firestarter restart
 * Stopping the Firestarter firewall...                                  [ OK ]
 * Starting the Firestarter firewall...                                  [ OK ]
Step 4) Test vpnc connection
You can start VPN connection either on the command line or with a GUI (Networker). To start VPN on a command line open Terminal and run:
$ sudo vpnc --natt-mode cisco-udp ACME-vpn
You’ll be first asked to provide password for the sudo, then you’ll be asked for the VPN password. After that you should see the standard welcome banner from your VPN provider. From this point onwards you have working VPN connection, you can open Terminal Service client and connect to your Windows workstation at work or whatever you want to do.
When you wish to close VPN connection simply run the following command in terminal window:
$ sudo vpnc-disconnect
Configuring VPN connection with GUI using Network Manager:
If you prefer to work with a GUI network manager you can setup vpnc connection with plugin that was installed in step 1. Here are some screenshots (let’s say I want to configure ACME-vpn-2 connection):
1) Open network manager (up and down arrow at the left)

2) Select “VPN connections”, then “Configure VPN”
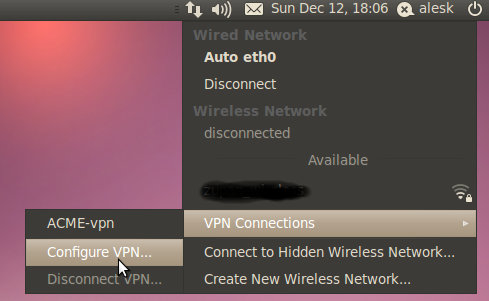
* Don’t be confused by existing ACME-vpn, this is vpn that I already created.
3) Click on Add button to setup new VPN connection

4) From combo box select “Cisco Compatible VPN (vpnc)”

5) Fill the VPN tab with VPN data according to your setup

6) Also select IP4 tab and select “Automatic (VPN) addresses only
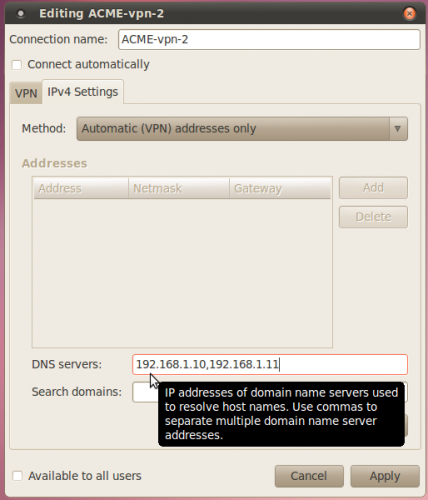
* Optionally enter (internal – inside VPN) DNS addresses.
Now, you can connect/disconnect from VPN by simply selecting VPN connection from Network Manager GUI.
How to install Cisco VPN Client on Ubuntu 10.04
Yesterday, I finally managed to install Cisco VPN client for Linux on my main home workstation, running Ubuntu 10.04. Though, I’m still troubleshooting connection issue with our service provider, I believe I’m one step further of true, Windows free workstation running on ASROCK mini.
Many thanks go to Ngo Ky Lam and his instructions HOW TO INSTALL CISCO VPN CLIENT ON UBUNTU JAUNTY JACKALOPE AND KARMIC KOALA 64 BIT, which are also valid for Lucid Lynx.
Here are the steps that I performed to install Cisco VPN Client 4.8.02.030:
--
-- Download VPN Client for Linux (4.8.02.030) from Cisco if you can,
-- since I don't have access to Cisco support site, I searched the web for the client package...
--
$ wget http://its.eiu.edu/software/vpnclient-linux-x86_64-4.8.02.0030-k9.tar.gz
$ tar xzvf vpnclient-linux-x86_64-4.8.02.0030-k9.tar.gz
--
-- Download and install patch from lamnk.com
--
$ cd vpnclient
$ wget http://www.lamnk.com/download/fixes.patch
$ alesk@dbaportal:~/vpnclient$ patch < ./fixes.patch
patching file frag.c
patching file interceptor.c
patching file IPSecDrvOS_linux.c
patching file linuxcniapi.c
patching file linuxkernelapi.c
patching file Makefile
--
-- Install VPN Client accepting all defaults
--
$ sudo ./vpn_install

Cisco Systems VPN Client Version 4.8.02 (0030) Linux Installer
Copyright (C) 1998-2006 Cisco Systems, Inc. All Rights Reserved.

By installing this product you agree that you have read the
license.txt file (The VPN Client license) and will comply with
its terms.

Directory where binaries will be installed [/usr/local/bin]

Automatically start the VPN service at boot time [yes]

In order to build the VPN kernel module, you must have the
kernel headers for the version of the kernel you are running.

Directory containing linux kernel source code [/lib/modules/2.6.32-25-generic/build]

* Binaries will be installed in "/usr/local/bin".
* Modules will be installed in "/lib/modules/2.6.32-25-generic/CiscoVPN".
* The VPN service will be started AUTOMATICALLY at boot time.
* Kernel source from "/lib/modules/2.6.32-25-generic/build" will be used to build the module.

Is the above correct [y]

Making module
make -C /lib/modules/2.6.32-25-generic/build SUBDIRS=/home/alesk/vpnclient modules
make[1]: Entering directory `/usr/src/linux-headers-2.6.32-25-generic'
  CC [M]  /home/alesk/vpnclient/linuxcniapi.o
  CC [M]  /home/alesk/vpnclient/frag.o
  CC [M]  /home/alesk/vpnclient/IPSecDrvOS_linux.o
  CC [M]  /home/alesk/vpnclient/interceptor.o
  CC [M]  /home/alesk/vpnclient/linuxkernelapi.o
  LD [M]  /home/alesk/vpnclient/cisco_ipsec.o
  Building modules, stage 2.
  MODPOST 1 modules
WARNING: could not find /home/alesk/vpnclient/.libdriver.so.cmd for /home/alesk/vpnclient/libdriver.so
  CC      /home/alesk/vpnclient/cisco_ipsec.mod.o
  LD [M]  /home/alesk/vpnclient/cisco_ipsec.ko
make[1]: Leaving directory `/usr/src/linux-headers-2.6.32-25-generic'
Create module directory "/lib/modules/2.6.32-25-generic/CiscoVPN".
Copying module to directory "/lib/modules/2.6.32-25-generic/CiscoVPN".
Already have group 'bin'

Creating start/stop script "/etc/init.d/vpnclient_init".
    /etc/init.d/vpnclient_init
Enabling start/stop script for run level 3,4 and 5.
Creating global config /etc/opt/cisco-vpnclient

Installing license.txt (VPN Client license) in "/opt/cisco-vpnclient/":
    /opt/cisco-vpnclient/license.txt

Installing bundled user profiles in "/etc/opt/cisco-vpnclient/Profiles/":
* New Profiles     : at_eiu eiu sample

Copying binaries to directory "/opt/cisco-vpnclient/bin".
Adding symlinks to "/usr/local/bin".
    /opt/cisco-vpnclient/bin/vpnclient
    /opt/cisco-vpnclient/bin/cisco_cert_mgr
    /opt/cisco-vpnclient/bin/ipseclog
Copying setuid binaries to directory "/opt/cisco-vpnclient/bin".
    /opt/cisco-vpnclient/bin/cvpnd
Copying libraries to directory "/opt/cisco-vpnclient/lib".
    /opt/cisco-vpnclient/lib/libvpnapi.so
Copying header files to directory "/opt/cisco-vpnclient/include".
    /opt/cisco-vpnclient/include/vpnapi.h

Setting permissions.
    /opt/cisco-vpnclient/bin/cvpnd (setuid root)
    /opt/cisco-vpnclient (group bin readable)
    /etc/opt/cisco-vpnclient (group bin readable)
    /etc/opt/cisco-vpnclient/Profiles (group bin readable)
    /etc/opt/cisco-vpnclient/Certificates (group bin readable)
* You may wish to change these permissions to restrict access to root.
* You must run "/etc/init.d/vpnclient_init start" before using the client.
* This script will be run AUTOMATICALLY every time you reboot your computer.
After you installed the client, copy your Cisco VPN client profile(s) that were given you by your system admin to /etc/opt/cisco-vpnclient/Profiles. If your profile is named AcmeVPN.pcf, then you can connect with:
--
-- Check that vpnclient_init service is running...
-- Optionally, install package sysvconfig if service util is missing on your machine
-- $ sudo apt-get install sysvconfig
--
$ service vpnclient_init status
--
-- if vpnclient_init is not running, then start the service...
--
$ sudo service vpnclient_init start
--
-- now, you can start a VPN connection with the client,
-- specifying the name of particular profile...
---
$ sudo vpnclient connect AcmeVPN
As I mentioned at the beginning of this post, I’m troubleshooting the connection to my workplace. As far as I can tell, Cisco client is working fine, it’s just that connection is terminated by the client for some (unknown) reason. I’m receiving:
Cisco Systems VPN Client Version 4.8.02 (0030)

Copyright (C) 1998-2007 Cisco Systems, Inc. All Rights Reserved.

Client Type(s): Linux

Running on: Linux 2.6.32-26-generic #47-Ubuntu SMP Wed Nov 17 15:59:05 UTC 2010 i686

Config file directory: /etc/opt/cisco-vpnclient
Initializing the VPN connection.
Contacting the gateway at xxx.xxx.xxx.xxx
Contacting the gateway at xxx.xxx.xxx.xxx
Secure VPN Connection terminated locally by the Client
Reason: Failed to establish a VPN connection.
There are no new notification messages at this time.
It must be something either in profile (pcf) file or perhaps with certificates (/etc/opt/cisco-vpnclient/Certificates).
[Update on December 12, 2010: I gave up on troubleshooting Cisco client for Linux – instead I’m happy to report that vpnc works flawlessly on my Ubuntu 10.04, as I wrote it here.]
ASRock mini – Part 4.
Just a quick note about ASRock running Windows 7 as a guest on Ubuntu (Lucid Lynx) host. The sole purpose of having Windows guest on my Ubuntu is to run Cisco VPN client that I need for remote access to my office (unfortunately, our “corporate” policy supports only VPN client for Windows) .
I’m happy to report that ASRock with 2GB RAM (256MB is used for graphic card) and dual core Atom 330 (1.6 GHz) processor is more than sufficient to run Windows 7 as a guest with 768MB RAM and one virtual CPU under VirtualBox 3.2. And that’s pretty much all I need from Windows 7 – to run VPN client plus Remote Desktop.
The only peculiarity I delved with VirtualBox on Ubuntu 10.04 was the following warning that I got during the guest startup:
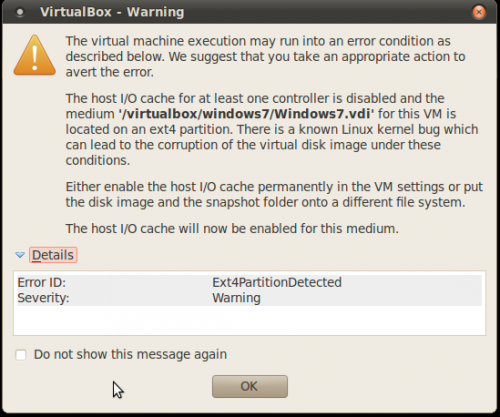
which I fixed by following the recommendation and turning the Host I/O cache on:


You must be logged in to post a comment.