Author Archives: alesk
Android SDK on Ubuntu 10.04
It was about time to install Android SDK on my ASROCK workstation powered by Ubuntu 10.04. Right know, I’m using Dalvik Debug Monitor from Android SDK to take screenshot from my HTC Hero, but on the long run I think I’ll need the SDK if I’ll ever want to write and run some python script on Android using excellent SL4A (Scripting Layer for Android).
PART 1 – enabling ddms
Make sure Java jdk is in the path (if you don’t have java on your machine, install it with sudo apt-get openjdk-6-jdk).
I used JDK that I installed for Oracle SQLDeveloper.
$ export PATH=/oracle/jdk1.6.0_21/bin:$PATH
$ mkdir android_sdk
$ cd android_sdk
$ pwd
/home/alesk/android_sdk
Download and install Android SDK:
$ wget http://dl.google.com/android/android-sdk_r10-linux_x86.tgz
$ tar zxvf android-sdk_r10-linux_x86.tgz
$ cd android-sdk-linux_x86/
If you wish to run ddms (Dalvik Debug monitor) you’ll have to install “Android SDK Platform-tools”.
Launch android GUI and install package:
$ cd tools
$ ./android
Open Available packages and select “Android SDK Platform-tools, Revision 3”:

After installation completes, make sure that you run adb as root (by default adb starts as user).
$ cd /home/alesk/android_sdk/android-sdk-linux_x86/platform-tools
$ ./adb kill-server
$ sudo ./adb start-server
[sudo] password for alesk:
* daemon not running. starting it now on port 5037 *
* daemon started successfully *
Check if you can see your phone as a device.
$ ./adb devices
List of devices attached
HT97RL904617	device
Now you can start ddms (Dalvik Debug Monitor).
$ cd /home/alesk/android_sdk/android-sdk-linux_x86/tools
$ ./ddms
PART 2 – Preparing Android Emulator
$ cd android_sdk/tools
$ ./android
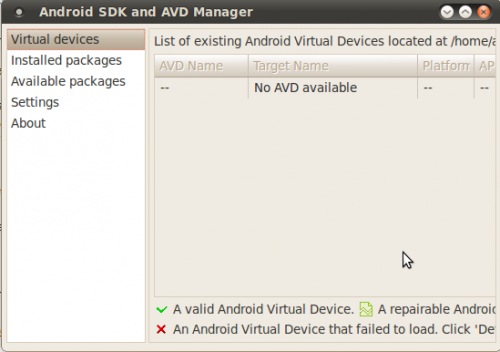
As you can see, there are no Virtual Devices yet. Let’s create one, but before we start we need to download and install API’s for target device.
Select “Installed packages”, then button “Update all”. From the list I selected Accept All. Be patient, it’ll take quite some time for download to finish (it took approx. 2 hours on 1Mbps “broadband”).

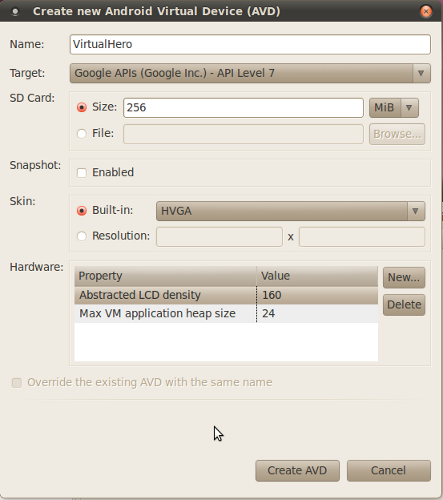
After downloads complete we can start creating Virtual Android device that’ll serve as emulator.
Click button “New”, then fill necessary information about your target device. Since I own HTC Hero with Android OS 2.1 I created virtual devices as shown on the picture:
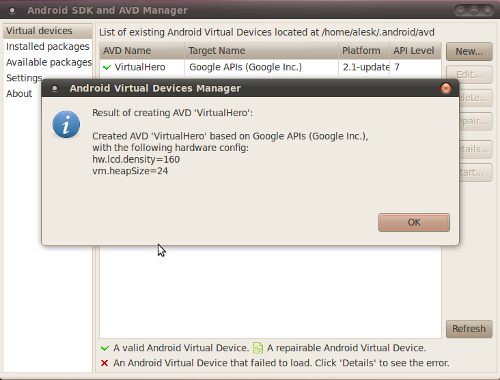
After you click on “Create AVD”, you’ll see newly created virtual device among Virtual devices section.
Now, we can start Virtual device by selecting device from the list and clicking on Start button, then on Launch button (leaving everything on the menu in default state).
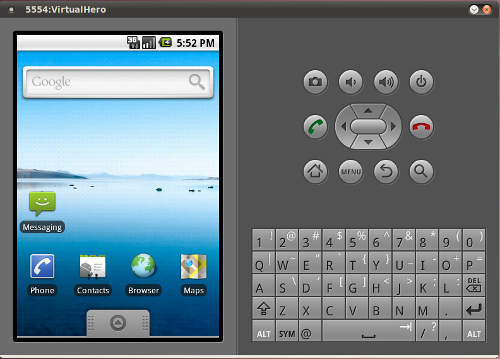
It can take several minutes for Virtual Device to “boot”, in short, don’t expect from emulator the same speed as if you’re using “real” phone (on my ASROCK, with dual core Atom processor, it took approx. five minutes to boot the virtual phone device. In general, everything is extremely slow compared with a real Android phone!). Eventually, you should see android home screen similar to this one:
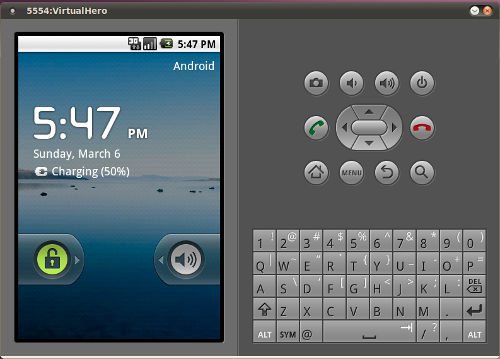
Use mouse to unlock your “phone”, by dragging lock to the right. Mouse click replaces a “tap” on real phone.
I tested my newly created virtual “HTC Hero” device by installing Python for Android and SL4A according to this article..
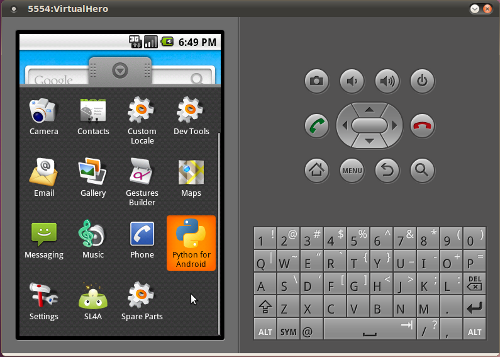
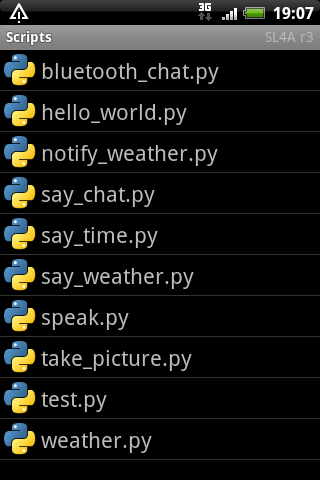
If you “tap” on SL4A you should see python demo scripts.
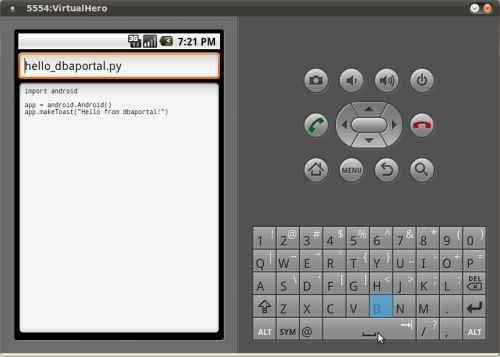
Let’s say that we wrote some python script (hello_dbaportal.py) that we want to upload to virtual device, it’s as easy as:
$ cd android_sdk/platform-tools
$ ./adb push hello_dbaportal.py /sdcard/sl4a/scripts
* daemon not running. starting it now on port 5037 *
* daemon started successfully *
1 KB/s (80 bytes in 0.077s)
If you check emulator, you’ll find python script hello_dbaportal.py, from where you can run the code…
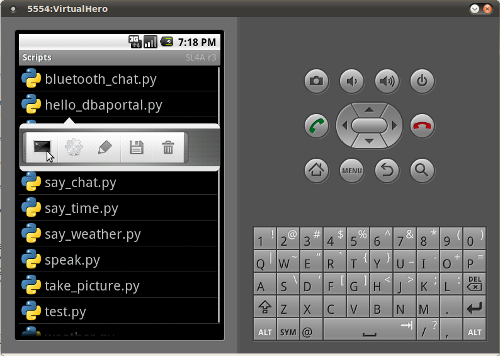
or, if you’re keen to fiddle with the script inside emulator, you can also edit the script…
Python for Android
I knew it was just a matter of time when someone ports python to Android. Kudos to Google employee Damon Kohler, who decided to built SL4A – Scripting Layer For Android in his 20% time that Google allows their employees to work on “pet projects”. Not only that SL4A supports python, other contributors ported some other popular interpreters to SL4A, such as Perl, JRuby, JavaScript, Lua, BeanShell and Tcl…more interpreters are on the way.
Linux Journal published interesting article in March issue, #204, titled “Python for Android”.
I’m happy to report that installing SL4A and python for Android on my HTC Hero (running Android 2.1) as described in the above article was trivial.
Here are the steps on how to install SL4A and Python for Android on HTC Hero (with OS 2.1):
- Temporary enable installation of applications from unknown sources
Menu -> Settings -> Applications -> check "Unknown sources"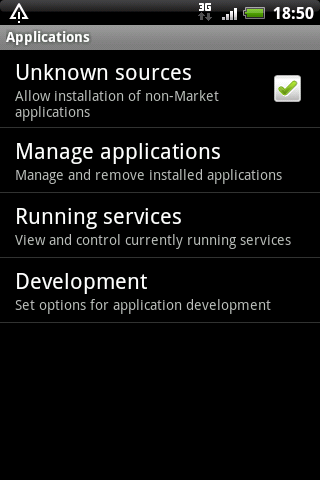
- open Android web browser on your HTC phone and go to http://code.google.com/p/android-scripting/.
If you tap on “QR Code” on the web page you’ll start downloading SL4A, at the time of this writing it was sl4a_r3.apk.
After download completes, simply tap the downloaded apk package, then tap on Install button. This will install SL4A on your phone. Test the installation by tapping on Open button to open SL4A. If you receive warning “No matches found” simply ignore it, because you don’t have any script yet.
Now, that we have SL4A “engine” ready, it’s time to install Python itself. - return to Android web browser and open the page http://code.google.com/p/android-scripting/. Find “Featured Downloads” section on left side of the page, then find the package PythonForAndroid_r4.apk. Tap the package to initiate the download, when download completes tap the package to start installation by tapping “Install button”.
When installation completes tap the “Open button” followed by tap on Install button. This will download and install python support libraries from SL4A web site and add them to SL4A.
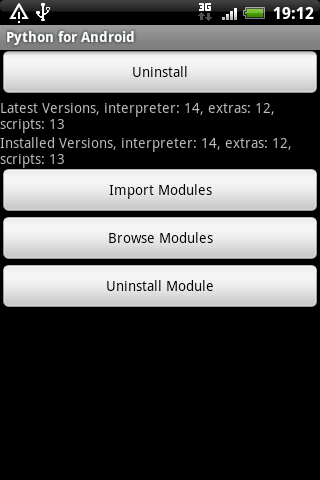
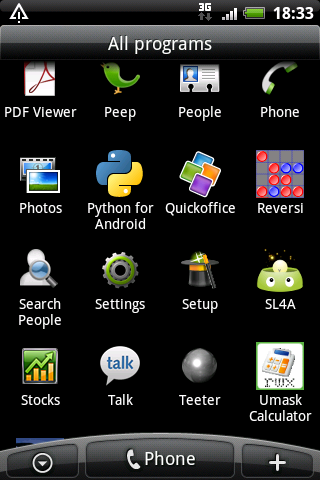
- That’s it. If you check your Applications you’ll see two new icons, “Python for Android” and “SL4A”. At the time of this writing, python version was 2.6.2.
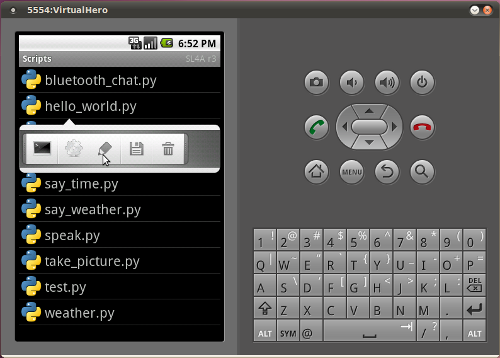
- If you open SL4A you should see some pre-created python demo scripts on the list.
- If you tap on the particular script you can pick action from the menu.
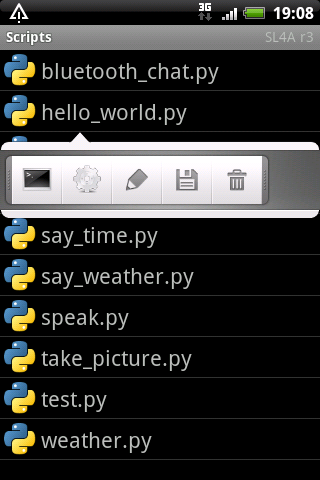
- For example, you can Edit the script.

- Finally, don’t forget to disable option that allows installing applications from unknown sources (see point #1).
How to compile cx_Oracle (python 3.2 for Windows x64)
I needed cx_Oracle 5.0.4 binaries for recently released python 3.2 for Windows x64. Since there were no binaries released for python 3.2, I built binaries myself.
Ingredients that you’ll need for cooking:
- 64-bit Windows (I used Windows 2003 x64)
- 64-bit python 3.2
- 64-bit Oracle client of your choice (I build with both, 10g R2 and 11g R2)
- Visual Studio 2008 Express (don’t be tempted to install VS 2010!!)
- Windows SDK for Windows 2008 and .NET 3.5
- Optionally: I used Virtual Clone Drive for conveniently mounting ISO images.
Note: Similarly, you can build 32-bit cx_Oracle, in that case you’ll use 32-bit Windows, 32-bit python 3.2 and 32-bit Oracle client. I’ll point to the difference when necessary.
0) Prepare Windows x64 (I used Windows 2003 x64 test machine)
1) Download Visual Studio Express 2008 with SP1 from Microsoft site
I downloaded VS2008ExpressWithSP1ENUX1504728.iso. I’ll let you to find the iso on Microsoft site for yourself!
Because Python 3.2 was built with VC 2008, you must use VS 2008 and not for example more recent version, VS 2010.
2) Install Visual C++ with default options
Note: When installing on x64, some components are installed in “Program Files (x86)” and some in “Program Files”.
3) Download Windows SDK for Windows 2008 and NET 3.5
I downloaded 6.0.6001.18000.367-KRMSDK_EN.iso.
4) Install SDK for Windows 2008 and NET 3.5 in default location
Note: I deselected Documentation and Samples to speedup the installation process.
5) Install 64-bit python 3.2 for Windows x64
Note: Alternatively, if you want to build 32-bit cx_Oracle binary, you must install 32-bit python 3.2.
6) Download cx_Oracle 5.0.4 tar file with the source
I downloaded cx_Oracle-5.0.4.tar.gz. Unzip in some temporary directory (D:\cx_Oracle)
7) Prepare command prompt for build
Start -> Run ->
If you're building on Windows x64:
%comspec% /k ""C:\Program Files (x86)\Microsoft Visual Studio 9.0\VC\bin\vcvars64.bat""
If you're building on x86:
%comspec% /k ""C:\Program Files\Microsoft Visual Studio 9.0\VC\bin\vcvars32.bat""
set ORACLE_HOME=D:\ORACLE\ORA11R2\NETWORK\ADMIN
set PATH=D:\ORACLE\ORA11R2\BIN;C:\python32;%PATH%
set PYTHONHOME=D:\Python32
8) cd to temporary cx_Oracle directory
cd D:\cx_Oracle\cx_Oracle
cmd> python setup.py build
..this step wil create build directory with the build, you'll see something like this:
D:\cx_Oracle\cx_Oracle-5.0.4>dir build
Volume in drive D is SW
Volume Serial Number is B83A-326E
Directory of D:\cx_Oracle\cx_Oracle-5.0.4\build
04.03.2011 15:06 .
04.03.2011 15:06 ..
04.03.2011 15:06 lib.win-amd64-3.2-11g
04.03.2011 15:06 temp.win-amd64-3.2-11g
0 File(s) 0 bytes
4 Dir(s) 10.261.749.760 bytes free
Now you can install library with:
cmd> python setup.py install
You will see output simiral to this one:
D:\cx_Oracle\cx_Oracle-5.0.4>python setup.py install
running install
running build
running build_ext
running install_lib
copying build\lib.win-amd64-3.2-11g\cx_Oracle.pyd -> C:\python32\Lib\site-packages
running install_data
creating C:\python32\cx_Oracle-doc
copying BUILD.txt -> C:\python32\cx_Oracle-doc
copying LICENSE.TXT -> C:\python32\cx_Oracle-doc
copying README.TXT -> C:\python32\cx_Oracle-doc
copying HISTORY.txt -> C:\python32\cx_Oracle-doc
creating C:\python32\cx_Oracle-doc\html
copying html\connection.html -> C:\python32\cx_Oracle-doc\html
copying html\cursor.html -> C:\python32\cx_Oracle-doc\html
copying html\genindex.html -> C:\python32\cx_Oracle-doc\html
copying html\index.html -> C:\python32\cx_Oracle-doc\html
copying html\license.html -> C:\python32\cx_Oracle-doc\html
copying html\lob.html -> C:\python32\cx_Oracle-doc\html
copying html\modindex.html -> C:\python32\cx_Oracle-doc\html
copying html\module.html -> C:\python32\cx_Oracle-doc\html
copying html\objects.inv -> C:\python32\cx_Oracle-doc\html
copying html\search.html -> C:\python32\cx_Oracle-doc\html
copying html\searchindex.js -> C:\python32\cx_Oracle-doc\html
copying html\session_pool.html -> C:\python32\cx_Oracle-doc\html
copying html\subscription.html -> C:\python32\cx_Oracle-doc\html
copying html\variable.html -> C:\python32\cx_Oracle-doc\html
creating C:\python32\cx_Oracle-doc\html\_static
copying html\_static\basic.css -> C:\python32\cx_Oracle-doc\html\_static
copying html\_static\default.css -> C:\python32\cx_Oracle-doc\html\_static
copying html\_static\doctools.js -> C:\python32\cx_Oracle-doc\html\_static
copying html\_static\file.png -> C:\python32\cx_Oracle-doc\html\_static
copying html\_static\jquery.js -> C:\python32\cx_Oracle-doc\html\_static
copying html\_static\minus.png -> C:\python32\cx_Oracle-doc\html\_static
copying html\_static\plus.png -> C:\python32\cx_Oracle-doc\html\_static
copying html\_static\pygments.css -> C:\python32\cx_Oracle-doc\html\_static
copying html\_static\searchtools.js -> C:\python32\cx_Oracle-doc\html\_static
creating C:\python32\cx_Oracle-doc\samples
copying samples\DatabaseChangeNotification.py -> C:\python32\cx_Oracle-doc\samples
copying samples\DatabaseShutdown.py -> C:\python32\cx_Oracle-doc\samples
copying samples\DatabaseStartup.py -> C:\python32\cx_Oracle-doc\samples
copying samples\ReturnLongs.py -> C:\python32\cx_Oracle-doc\samples
copying samples\ReturnUnicode.py -> C:\python32\cx_Oracle-doc\samples
copying samples\RowsAsInstance.py -> C:\python32\cx_Oracle-doc\samples
creating C:\python32\cx_Oracle-doc\test
copying test\3kNumberVar.py -> C:\python32\cx_Oracle-doc\test
copying test\3kStringVar.py -> C:\python32\cx_Oracle-doc\test
copying test\Connection.py -> C:\python32\cx_Oracle-doc\test
copying test\Cursor.py -> C:\python32\cx_Oracle-doc\test
copying test\CursorVar.py -> C:\python32\cx_Oracle-doc\test
copying test\DateTimeVar.py -> C:\python32\cx_Oracle-doc\test
copying test\IntervalVar.py -> C:\python32\cx_Oracle-doc\test
copying test\LobVar.py -> C:\python32\cx_Oracle-doc\test
copying test\LongVar.py -> C:\python32\cx_Oracle-doc\test
copying test\NumberVar.py -> C:\python32\cx_Oracle-doc\test
copying test\ObjectVar.py -> C:\python32\cx_Oracle-doc\test
copying test\SessionPool.py -> C:\python32\cx_Oracle-doc\test
copying test\SetupTest.sql -> C:\python32\cx_Oracle-doc\test
copying test\StringVar.py -> C:\python32\cx_Oracle-doc\test
copying test\test.py -> C:\python32\cx_Oracle-doc\test
copying test\test3k.py -> C:\python32\cx_Oracle-doc\test
copying test\TestEnv.py -> C:\python32\cx_Oracle-doc\test
copying test\test_dbapi20.py -> C:\python32\cx_Oracle-doc\test
copying test\TimestampVar.py -> C:\python32\cx_Oracle-doc\test
copying test\uConnection.py -> C:\python32\cx_Oracle-doc\test
copying test\uCursor.py -> C:\python32\cx_Oracle-doc\test
copying test\uCursorVar.py -> C:\python32\cx_Oracle-doc\test
copying test\uDateTimeVar.py -> C:\python32\cx_Oracle-doc\test
copying test\uIntervalVar.py -> C:\python32\cx_Oracle-doc\test
copying test\uLobVar.py -> C:\python32\cx_Oracle-doc\test
copying test\uLongVar.py -> C:\python32\cx_Oracle-doc\test
copying test\UnicodeVar.py -> C:\python32\cx_Oracle-doc\test
copying test\uNumberVar.py -> C:\python32\cx_Oracle-doc\test
copying test\uObjectVar.py -> C:\python32\cx_Oracle-doc\test
copying test\uSessionPool.py -> C:\python32\cx_Oracle-doc\test
copying test\uStringVar.py -> C:\python32\cx_Oracle-doc\test
copying test\uTimestampVar.py -> C:\python32\cx_Oracle-doc\test
running install_egg_info
Writing C:\python32\Lib\site-packages\cx_Oracle-5.0.4-py3.2.egg-info
9) Test the build by importing cx_Oracle library
cmd> python
D:\cx_Oracle\cx_Oracle-5.0.4>python
Python 3.2 (r32:88445, Feb 20 2011, 21:30:00) [MSC v.1500 64 bit (AMD64)] on win32
Type "help", "copyright", "credits" or "license" for more information.
>>> import cx_Oracle
>>>
Optionally, if you want to build cx_Oracle for 10g client (assuming you have
10g client installed on the same machine, simply change the home and run the build:
set ORACLE_HOME=D:\ORACLE\ORA10

set PATH=D:\ORACLE\ORA10\BIN;%PATH%
python setup.py build
and you’ll find two additional directories under build:
D:\cx_Oracle\cx_Oracle-5.0.4>dir build

 Volume in drive D is SW

 Volume Serial Number is B83A-326E
Directory of D:\cx_Oracle\cx_Oracle-5.0.4\build
04.03.2011 15:16 .
04.03.2011 15:16 ..
04.03.2011 15:13 bdist.win-amd64
04.03.2011 15:16 lib.win-amd64-3.2-10g
04.03.2011 15:06 lib.win-amd64-3.2-11g
04.03.2011 15:15 temp.win-amd64-3.2-10g
04.03.2011 15:06 temp.win-amd64-3.2-11g
0 File(s) 0 bytes
7 Dir(s) 10.260.930.560 bytes free
Happy cx_Oracle coding!
Replacement for net send (msg.exe)
This is a reminder on how can we send messages to Windows7/2008 after Microsoft deprecated net send mechanism.
Here I want to send message from my Windows XP SP3 workstation to Windows 7 SP1 machine. I’ll be using with msg.exe, the replacement for net send.
E:\>msg /?
Send a message to a user.

MSG {username | sessionname | sessionid | @filename | *}
    [/SERVER:servername] [/TIME:seconds] [/V] [/W] [message]

  username            Identifies the specified username.
  sessionname         The name of the session.
  sessionid           The ID of the session.
  @filename           Identifies a file containing a list of usernames,
                      sessionnames, and sessionids to send the message to.
  *                   Send message to all sessions on specified server.
  /SERVER:servername  server to contact (default is current).
  /TIME:seconds       Time delay to wait for receiver to acknowledge msg.
  /V                  Display information about actions being performed.
  /W                  Wait for response from user, useful with /V.
  message             Message to send.  If none specified, prompts for it
                      or reads from stdin.
My first attempt failed with error:
This was executed on my XP workstation trying
to send message to "me" logged on mywindows7 PC:
E:\>msg alesk /server:mywindows7  "I need some coffee!!"
Error opening Terminal server kavsek7
Error [1717]:The interface is unknown.
The solution is to allow remote RPC execution on MYWINDOWS7 machine. On MYWINDOWS7 I opened Registry editor and changed AllowRemoteRPC from 0 to 1:
HKLM\SYSTEM\CurrentControlSet\Control\Terminal Server
Name : AllowRemoteRPC
Type : REG_DWORD
Value : 1
Of course, it’s completely up to you to decide if you can live with open RPC port.
Sharing Model on Dropbox 1.0.10
I was goofing around with the Dropbox sharing option, trying to find a workaround for the “implementation bug”; a sad fact that at the moment we can share folder(s) only in read-write mode. Don’t know how such fundamental flaw in a design was not addressed yet, at least not in the production version (1.0.10 as of now, December 31, 2010). However, I found some forum threads where something called “Get a sharable link” was mentioned, which allows for non-public file or folder to be shared in read-only mode. If you’re using current (production) version of Dropbox client you perhaps wonder how can you enable this beta feature. Well, after I spent a considerable time browsing various forum threads, I finally found the hint on how to enable Dropbox Sharable model.
All you need to do is to login to your Dropbox account and then open this url:
https://www.dropbox.com/enable_shmodel
Hopefully, Dropbox team will release Sharable Model in production in early 2011, adding some additional features along the way (password protection being the most notable one).
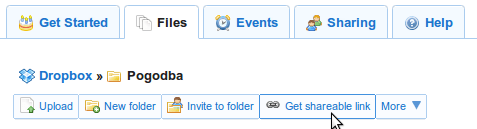
After you enable sharable model you’ll see additional option in the main menu as shown on the picture:
as well as on the context menu of file or folder:

Warning! Despite the fact that generated link is hard to guess, it’s not unreasonable to expect that someone already has a script that can generate strings on the fly and then trying to open url’s, so use sharable links as a convenient feature for sharing files and/or folders of semipublic type — the ones that should not be put in official public folder, yet the World will not stop spinning if someone gets those files.

You must be logged in to post a comment.