Blog Archives
IronPython – working with Registry
Here is a code snippet that I wrote recently for IronPython, correcting some registry information that I put by mistake in our image that is used for cloning client PC’s. I’m sure PowerShell script would be even shorter and cleaner, but I had to come with some working code in a hurry.
# -*- coding: cp1250 -*-
# odbc_patch.py -- patching my shallowness
# AlesK.

__about__= "IronPython script // odbc_patch2.py by AlesK"

from Microsoft.Win32 import Registry

# -----------------------------------------------
# How to enumerate a node from ODBC.INI.
# Print System DSN names with SERVER key value if present
# (SERVER key is mandatory for MS ODBC for Oracle, MySQL ODBC,
# etc., but not for Oracle supplied driver!
#
# For complete reference to Regirstry class refer to:
# msdn.microsoft.com/en-us/library/microsoft.win32.registry.aspx
# You can use:
# Registry.ClassesRoot|CurrentConfig|CurrentUser|
#          LocalMachine|PerformanceData|Users
# ------------------------------------------------
system_dsn = Registry.LocalMachine.OpenSubKey('Software\\ODBC\\ODBC.INI')

for dsn in system_dsn.GetSubKeyNames():
    dsn_key = system_dsn.OpenSubKey(dsn)
    server = dsn_key.GetValue('SERVER')
    # print only those DSN's that were created with MS ODBC)
    # and thus have SERVER defined
    if server is not None:
        print("DSN=" + dsn + " SERVER=" + str(server))

# ------------------------------------------------------
# How to read and change value in registry.
# Registry.GetValue
# Registry.SetValue
#
# The plot: by mistake I added MS at the end of SERVER variable
# for DSN's that are using MS ODBC driver. Instead of
# SERVER = ORAXMS I really want SERVER = ORAX, striping off MS.
# Candidates in my case are: ORAXMS, ORAYMS, ORAZMS.
# ------------------------------------------------------

odbc_dsn = ['ORAXMS','ORAYMS','ORAZMS']
odbc_node = "HKEY_LOCAL_MACHINE\\Software\\ODBC\\ODBC.INI"
odbc_key  = "SERVER"

for dsn in odbc_dsn:
    value = ''
    value = Registry.GetValue(odbc_node + '\\' + dsn, odbc_key, value)
    if value in odbc_dsn:
        Registry.SetValue(odbc_node + '\\' + dsn, odbc_key, dsn.strip('MS'))
        print("ODBC.INI: patched " + dsn + " SERVER=" + dsn +
              " to SERVER=" + dsn.strip('MS'))
    else:
        print("ODBC.INI: " + dsn + " - nothing to patch.")
Sample output:
C:\Scripts\IronPython\Registry>ipy odbc_patch2.py

DSN=ORAXMS SERVER=ORAXMS

DSN=ORAYMS SERVER=ORAYMS

DSN=ORAZMS SERVER=ORAZMS

DSN=ORA6MS SERVER=ORAT

ODBC.INI: patched ORAXMS SERVER=ORAXMS to SERVER=ORAX

ODBC.INI: patched ORAYMS SERVER=ORAYMS to SERVER=ORAY

ODBC.INI: patched ORAZMS SERVER=ORAZMS to SERVER=ORAZ
Wake-On-Lan with Python 3.x
In addition to PowerShell Wake-On-LAN script example I found example that works with python 3.x in ActiveState Code recipes collection:
#!/usr/bin/env python
 # wol.py
 #
 # This module is from ActiveState Code Recipes:
 # http://code.activestate.com/recipes/358449-wake-on-lan/
 # and patched for Python 3 with:
 # http://code.activestate.com/recipes/577609-wake-on-lan-for-python-3/
 #
 # Example:
 # import wol
 # wol.wake_on_lan('70:F3:95:15:00:B5')
 #
import socket
import struct

def wake_on_lan(macaddress):
    """ Switches on remote computers using WOL. """

    # Check macaddress format and try to compensate
    if len(macaddress) == 12:
        pass
    elif len(macaddress) == 12 + 5:
        sep = macaddress[2]
        macaddress = macaddress.replace(sep,'')
    else:
        raise ValueError('Incorrect MAC address format')


    # Pad the synchronization stream
    data = b'FFFFFFFFFFFF' + (macaddress * 20).encode()
    send_data = b''

    # Split up the hex values in pack
    for i in range(0, len(data), 2):
        send_data += struct.pack('B', int(data[i: i + 2], 16))

    # Broadcast it to the LAN
    sock = socket.socket(socket.AF_INET, socket.SOCK_DGRAM)
    sock.setsockopt(socket.SOL_SOCKET, socket.SO_BROADCAST, 1)
    sock.sendto(send_data, ('255.255.255.255',7))
Wake-On-Lan with PowerShell
Here is a code snippet from PowerShell script that I found on the net (thanks Brandon!) that actually works, as opposed to many examples I tried out that did not send magic packet correctly…
function Send-WOL{
    param ($macaddy)
    $mymac = $macaddy.split(':') | %{ [byte]('0x' + $_) }
    if ($mymac.Length -ne 6)
    {
        throw 'Mac Address Must be 6 hex Numbers Separated by : or -'
    }
    Write-Verbose "Creating UDP Packet"
    $UDPclient = new-Object System.Net.Sockets.UdpClient
    $UDPclient.Connect(([System.Net.IPAddress]::Broadcast),4000)
    $packet = [byte[]](,0xFF * 6)
    $packet += $mymac * 16
    Write-Verbose ([bitconverter]::tostring($packet))
    [void] $UDPclient.Send($packet, $packet.Length)
    Write-Host  "   - Wake-On-Lan Packet of length $($packet.Length) sent to $mymac"
}
…and here is an example:
PS E:\> Send-Wol(’70:f3:95:15:00:b5′)
– Wake-On-Lan Packet of length 102 sent to 112 243 149 21 0 181
PS E:\>
Python for Android
I knew it was just a matter of time when someone ports python to Android. Kudos to Google employee Damon Kohler, who decided to built SL4A – Scripting Layer For Android in his 20% time that Google allows their employees to work on “pet projects”. Not only that SL4A supports python, other contributors ported some other popular interpreters to SL4A, such as Perl, JRuby, JavaScript, Lua, BeanShell and Tcl…more interpreters are on the way.
Linux Journal published interesting article in March issue, #204, titled “Python for Android”.
I’m happy to report that installing SL4A and python for Android on my HTC Hero (running Android 2.1) as described in the above article was trivial.
Here are the steps on how to install SL4A and Python for Android on HTC Hero (with OS 2.1):
- Temporary enable installation of applications from unknown sources
Menu -> Settings -> Applications -> check "Unknown sources"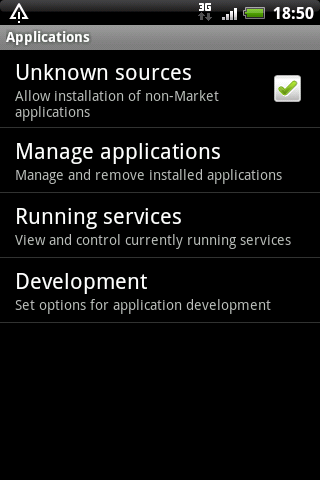
- open Android web browser on your HTC phone and go to http://code.google.com/p/android-scripting/.
If you tap on “QR Code” on the web page you’ll start downloading SL4A, at the time of this writing it was sl4a_r3.apk.
After download completes, simply tap the downloaded apk package, then tap on Install button. This will install SL4A on your phone. Test the installation by tapping on Open button to open SL4A. If you receive warning “No matches found” simply ignore it, because you don’t have any script yet.
Now, that we have SL4A “engine” ready, it’s time to install Python itself. - return to Android web browser and open the page http://code.google.com/p/android-scripting/. Find “Featured Downloads” section on left side of the page, then find the package PythonForAndroid_r4.apk. Tap the package to initiate the download, when download completes tap the package to start installation by tapping “Install button”.
When installation completes tap the “Open button” followed by tap on Install button. This will download and install python support libraries from SL4A web site and add them to SL4A.
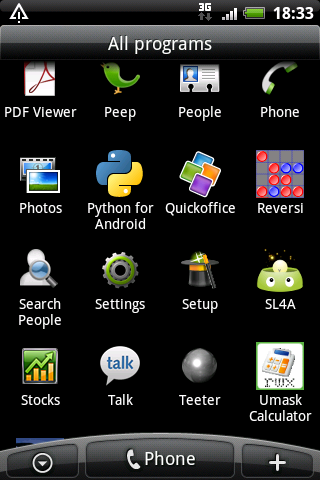
- That’s it. If you check your Applications you’ll see two new icons, “Python for Android” and “SL4A”. At the time of this writing, python version was 2.6.2.
- If you open SL4A you should see some pre-created python demo scripts on the list.
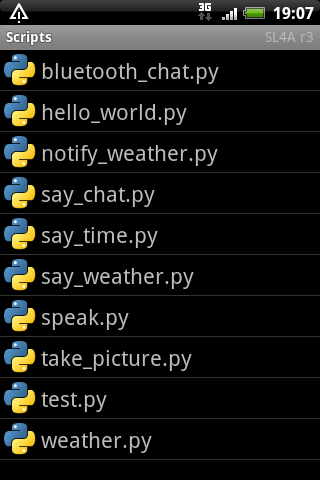
- If you tap on the particular script you can pick action from the menu.
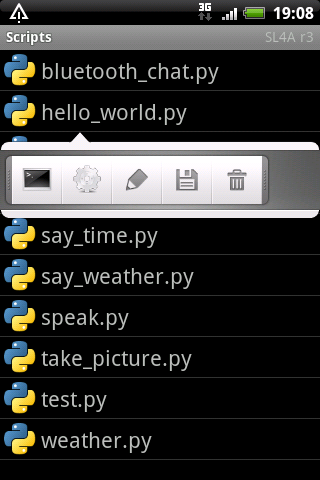
- For example, you can Edit the script.

- Finally, don’t forget to disable option that allows installing applications from unknown sources (see point #1).
How to compile cx_Oracle (python 3.2 for Windows x64)
I needed cx_Oracle 5.0.4 binaries for recently released python 3.2 for Windows x64. Since there were no binaries released for python 3.2, I built binaries myself.
Ingredients that you’ll need for cooking:
- 64-bit Windows (I used Windows 2003 x64)
- 64-bit python 3.2
- 64-bit Oracle client of your choice (I build with both, 10g R2 and 11g R2)
- Visual Studio 2008 Express (don’t be tempted to install VS 2010!!)
- Windows SDK for Windows 2008 and .NET 3.5
- Optionally: I used Virtual Clone Drive for conveniently mounting ISO images.
Note: Similarly, you can build 32-bit cx_Oracle, in that case you’ll use 32-bit Windows, 32-bit python 3.2 and 32-bit Oracle client. I’ll point to the difference when necessary.
0) Prepare Windows x64 (I used Windows 2003 x64 test machine)
1) Download Visual Studio Express 2008 with SP1 from Microsoft site
I downloaded VS2008ExpressWithSP1ENUX1504728.iso. I’ll let you to find the iso on Microsoft site for yourself!
Because Python 3.2 was built with VC 2008, you must use VS 2008 and not for example more recent version, VS 2010.
2) Install Visual C++ with default options
Note: When installing on x64, some components are installed in “Program Files (x86)” and some in “Program Files”.
3) Download Windows SDK for Windows 2008 and NET 3.5
I downloaded 6.0.6001.18000.367-KRMSDK_EN.iso.
4) Install SDK for Windows 2008 and NET 3.5 in default location
Note: I deselected Documentation and Samples to speedup the installation process.
5) Install 64-bit python 3.2 for Windows x64
Note: Alternatively, if you want to build 32-bit cx_Oracle binary, you must install 32-bit python 3.2.
6) Download cx_Oracle 5.0.4 tar file with the source
I downloaded cx_Oracle-5.0.4.tar.gz. Unzip in some temporary directory (D:\cx_Oracle)
7) Prepare command prompt for build
Start -> Run ->
If you're building on Windows x64:
%comspec% /k ""C:\Program Files (x86)\Microsoft Visual Studio 9.0\VC\bin\vcvars64.bat""
If you're building on x86:
%comspec% /k ""C:\Program Files\Microsoft Visual Studio 9.0\VC\bin\vcvars32.bat""
set ORACLE_HOME=D:\ORACLE\ORA11R2\NETWORK\ADMIN
set PATH=D:\ORACLE\ORA11R2\BIN;C:\python32;%PATH%
set PYTHONHOME=D:\Python32
8) cd to temporary cx_Oracle directory
cd D:\cx_Oracle\cx_Oracle
cmd> python setup.py build
..this step wil create build directory with the build, you'll see something like this:
D:\cx_Oracle\cx_Oracle-5.0.4>dir build
Volume in drive D is SW
Volume Serial Number is B83A-326E
Directory of D:\cx_Oracle\cx_Oracle-5.0.4\build
04.03.2011 15:06 .
04.03.2011 15:06 ..
04.03.2011 15:06 lib.win-amd64-3.2-11g
04.03.2011 15:06 temp.win-amd64-3.2-11g
0 File(s) 0 bytes
4 Dir(s) 10.261.749.760 bytes free
Now you can install library with:
cmd> python setup.py install
You will see output simiral to this one:
D:\cx_Oracle\cx_Oracle-5.0.4>python setup.py install
running install
running build
running build_ext
running install_lib
copying build\lib.win-amd64-3.2-11g\cx_Oracle.pyd -> C:\python32\Lib\site-packages
running install_data
creating C:\python32\cx_Oracle-doc
copying BUILD.txt -> C:\python32\cx_Oracle-doc
copying LICENSE.TXT -> C:\python32\cx_Oracle-doc
copying README.TXT -> C:\python32\cx_Oracle-doc
copying HISTORY.txt -> C:\python32\cx_Oracle-doc
creating C:\python32\cx_Oracle-doc\html
copying html\connection.html -> C:\python32\cx_Oracle-doc\html
copying html\cursor.html -> C:\python32\cx_Oracle-doc\html
copying html\genindex.html -> C:\python32\cx_Oracle-doc\html
copying html\index.html -> C:\python32\cx_Oracle-doc\html
copying html\license.html -> C:\python32\cx_Oracle-doc\html
copying html\lob.html -> C:\python32\cx_Oracle-doc\html
copying html\modindex.html -> C:\python32\cx_Oracle-doc\html
copying html\module.html -> C:\python32\cx_Oracle-doc\html
copying html\objects.inv -> C:\python32\cx_Oracle-doc\html
copying html\search.html -> C:\python32\cx_Oracle-doc\html
copying html\searchindex.js -> C:\python32\cx_Oracle-doc\html
copying html\session_pool.html -> C:\python32\cx_Oracle-doc\html
copying html\subscription.html -> C:\python32\cx_Oracle-doc\html
copying html\variable.html -> C:\python32\cx_Oracle-doc\html
creating C:\python32\cx_Oracle-doc\html\_static
copying html\_static\basic.css -> C:\python32\cx_Oracle-doc\html\_static
copying html\_static\default.css -> C:\python32\cx_Oracle-doc\html\_static
copying html\_static\doctools.js -> C:\python32\cx_Oracle-doc\html\_static
copying html\_static\file.png -> C:\python32\cx_Oracle-doc\html\_static
copying html\_static\jquery.js -> C:\python32\cx_Oracle-doc\html\_static
copying html\_static\minus.png -> C:\python32\cx_Oracle-doc\html\_static
copying html\_static\plus.png -> C:\python32\cx_Oracle-doc\html\_static
copying html\_static\pygments.css -> C:\python32\cx_Oracle-doc\html\_static
copying html\_static\searchtools.js -> C:\python32\cx_Oracle-doc\html\_static
creating C:\python32\cx_Oracle-doc\samples
copying samples\DatabaseChangeNotification.py -> C:\python32\cx_Oracle-doc\samples
copying samples\DatabaseShutdown.py -> C:\python32\cx_Oracle-doc\samples
copying samples\DatabaseStartup.py -> C:\python32\cx_Oracle-doc\samples
copying samples\ReturnLongs.py -> C:\python32\cx_Oracle-doc\samples
copying samples\ReturnUnicode.py -> C:\python32\cx_Oracle-doc\samples
copying samples\RowsAsInstance.py -> C:\python32\cx_Oracle-doc\samples
creating C:\python32\cx_Oracle-doc\test
copying test\3kNumberVar.py -> C:\python32\cx_Oracle-doc\test
copying test\3kStringVar.py -> C:\python32\cx_Oracle-doc\test
copying test\Connection.py -> C:\python32\cx_Oracle-doc\test
copying test\Cursor.py -> C:\python32\cx_Oracle-doc\test
copying test\CursorVar.py -> C:\python32\cx_Oracle-doc\test
copying test\DateTimeVar.py -> C:\python32\cx_Oracle-doc\test
copying test\IntervalVar.py -> C:\python32\cx_Oracle-doc\test
copying test\LobVar.py -> C:\python32\cx_Oracle-doc\test
copying test\LongVar.py -> C:\python32\cx_Oracle-doc\test
copying test\NumberVar.py -> C:\python32\cx_Oracle-doc\test
copying test\ObjectVar.py -> C:\python32\cx_Oracle-doc\test
copying test\SessionPool.py -> C:\python32\cx_Oracle-doc\test
copying test\SetupTest.sql -> C:\python32\cx_Oracle-doc\test
copying test\StringVar.py -> C:\python32\cx_Oracle-doc\test
copying test\test.py -> C:\python32\cx_Oracle-doc\test
copying test\test3k.py -> C:\python32\cx_Oracle-doc\test
copying test\TestEnv.py -> C:\python32\cx_Oracle-doc\test
copying test\test_dbapi20.py -> C:\python32\cx_Oracle-doc\test
copying test\TimestampVar.py -> C:\python32\cx_Oracle-doc\test
copying test\uConnection.py -> C:\python32\cx_Oracle-doc\test
copying test\uCursor.py -> C:\python32\cx_Oracle-doc\test
copying test\uCursorVar.py -> C:\python32\cx_Oracle-doc\test
copying test\uDateTimeVar.py -> C:\python32\cx_Oracle-doc\test
copying test\uIntervalVar.py -> C:\python32\cx_Oracle-doc\test
copying test\uLobVar.py -> C:\python32\cx_Oracle-doc\test
copying test\uLongVar.py -> C:\python32\cx_Oracle-doc\test
copying test\UnicodeVar.py -> C:\python32\cx_Oracle-doc\test
copying test\uNumberVar.py -> C:\python32\cx_Oracle-doc\test
copying test\uObjectVar.py -> C:\python32\cx_Oracle-doc\test
copying test\uSessionPool.py -> C:\python32\cx_Oracle-doc\test
copying test\uStringVar.py -> C:\python32\cx_Oracle-doc\test
copying test\uTimestampVar.py -> C:\python32\cx_Oracle-doc\test
running install_egg_info
Writing C:\python32\Lib\site-packages\cx_Oracle-5.0.4-py3.2.egg-info
9) Test the build by importing cx_Oracle library
cmd> python
D:\cx_Oracle\cx_Oracle-5.0.4>python
Python 3.2 (r32:88445, Feb 20 2011, 21:30:00) [MSC v.1500 64 bit (AMD64)] on win32
Type "help", "copyright", "credits" or "license" for more information.
>>> import cx_Oracle
>>>
Optionally, if you want to build cx_Oracle for 10g client (assuming you have
10g client installed on the same machine, simply change the home and run the build:
set ORACLE_HOME=D:\ORACLE\ORA10

set PATH=D:\ORACLE\ORA10\BIN;%PATH%
python setup.py build
and you’ll find two additional directories under build:
D:\cx_Oracle\cx_Oracle-5.0.4>dir build

 Volume in drive D is SW

 Volume Serial Number is B83A-326E
Directory of D:\cx_Oracle\cx_Oracle-5.0.4\build
04.03.2011 15:16 .
04.03.2011 15:16 ..
04.03.2011 15:13 bdist.win-amd64
04.03.2011 15:16 lib.win-amd64-3.2-10g
04.03.2011 15:06 lib.win-amd64-3.2-11g
04.03.2011 15:15 temp.win-amd64-3.2-10g
04.03.2011 15:06 temp.win-amd64-3.2-11g
0 File(s) 0 bytes
7 Dir(s) 10.260.930.560 bytes free
Happy cx_Oracle coding!

You must be logged in to post a comment.