Author Archives: alesk
ASRock mini – Part 2.
In part 2 I’ll continue my home adventure in replacing Windows XP workstation with Ubuntu 10.04.
Installing Oracle11g R2
In addition to Oracle XE I need full blown Oracle11g R2 Enterprise Edition on my Ubuntu box. There is no shortage of blog articles on the net with installation steps that need to be followed to successfully install Oracle11g R2 on Ubuntu. I installed 11g R2 according to:
- Installing Oracle11g R2 EE on Ubuntu 10.04 – Lucid Lynx
- OTN forum thread : Installing Oracle 11g R2 on Ubuntu 10.04 (solved)
The only minor difference in the steps that I needed to sort out by myself was that my target platform is 32-bit and blog author is using 64-bit, thus some variations in packages being installed. Other then that Oracle11g R2 installed and compiled without any errors (I didn’t installed grid infrastructure, so can’t say much about that part!).
Connecting HP ScanJet G2710
Lucid Lynx ships with the Simple Scan (Applications->Graphics), as name applies, simple software for scanning documents. After I turned on HP ScanJet, Simple Scan automatically recognized device and I could start scanning documents. I believe Simple scan is good enough to fulfill average user needs for scanning various forms and documents at home.
Just in case if I ever need more control over scanning preferences I installed Xsane:
$ sudo apt-get install xsane
Xsane had not problem recognizing HP ScanJet G2710. Both, Simple Scan and Xsane supports multi page output to pdf file, feature that I found very useful. The part of configuration (scanner) that I feared the most was surprisingly easy. I’m impressed.
Connecting Samsung ML-2850 laser printer
Adding my network laser printer, Samsung ML-2850 was almost as easy as adding scanner. The only thing I had to do is to open Printing applet System->Administration->Printing, then clicking on Add button, then Network Printer and Find Network Printer where I entered printer hostname. Everything else was configured automatically for me. Since my printer supports duplex print I had to give necessary privileges to my TOH, so that she can tweak with printer preferences (System->Administration->Users and groups->selected TOH->Advanced settings-> User Privileges -> Configure Printers).
Installing Oracle VirtualBox
Installing Oracle VM VirtualBox 3.2.8 was as easy as downloading appropriate deb file for Lucid Lynx. After download ends, package manager will initiate installation. That’s all. VirtualBox become indispensable in my daily work life, replacing my licensed VMWare Workstation for good.
Installing SQL Developer
From Oracle Technetwork (new name for OTN) I downloaded SQL Developer zip file under section SQL Developer for other platforms and Java JDK 6 Update 21 from here. I followed installation instruction for JDK that I found here. Installation steps can be summarized as:
$ cd /home/alesk/Downloads

$ sudo unzip sqldeveloper-2.1.1.64.45-no-jre.zip -d /oracle

$ sudo chown -R oracle:dba /oracle/sqldeveloper

-- I decided to install JDK into $ORACLE_BASE

$ chmod a+x jdk-6u21-linux-i586.bin

$ cd /oracle

$ sudo /home/alesk/Downloads/jdk-6u21-linux-i586.bin

$ sudo chown -R oracle:dba jdk1.6.0_21/

-- SQL Developer can now be launched with command:

$ sh /oracle/sqldeveloper/sqldeveloper.sh

The first time you launch SQL Developer you'll be asked for the path to JDK, in my case I entered /oracle/jdk1.6.0_21.
Installing KomodoEdit
I’m a big fan of ActiveState free editor, KomodoEdit. After downloading I executed the following steps to install KomodoEdit:
$ tar zxvf Komodo-Edit-5.2.4-4343-linux-libcpp6-x86.tar.gz

$ cd Komodo-Edit-5.2.4-4343-linux-libcpp6-x86/

# KomodoEdit was installe into /usr/local/komodo...

$ sudo sh install.sh

# Adding symbolic link to the common path...

$ sudo ln -s /usr/local/komodo/bin/komodo /usr/local/bin/komodo
And that’s all for today. :-)
dbms_crypto example
A couple of days ago I needed a quick solution that would limit access to some sensitive data (columns). Only a limited group of end users, selected developer and a DBA should see the content of some columns. Target table is otherwise stored in application schema that is shared by several developers, but only one of them should see the data. I knew that encryption is the way to go. Based on example published in Oracle 10g PL/SQL Packages and type reference for package DBMS_CRYPTO, I wrote simple package that will set decryption key for the session and allow for encryption and decryption of data.
Create or replace package dbcrypt is
  Procedure setkey( p_key  IN VARCHAR2 );
  Function encrypt( p_data IN VARCHAR2 ) Return RAW DETERMINISTIC;
  Function decrypt( p_data IN RAW ) Return VARCHAR2 DETERMINISTIC;
end dbcrypt;
/

Create or replace package body dbcrypt is

    ecryption_type PLS_INTEGER := SYS.DBMS_CRYPTO.ENCRYPT_AES128 +
                                  SYS.DBMS_CRYPTO.CHAIN_CBC +
                                  SYS.DBMS_CRYPTO.PAD_PKCS5;
    v_key RAW(16) := null;

    Procedure setkey (p_key IN VARCHAR2)
    IS
    BEGIN
      if p_key is not null then
        v_key := UTL_RAW.cast_to_raw(p_key);
       dbms_output.put_line(v_key);
      end if;
    END setkey;

    Function encrypt( p_data IN VARCHAR2 ) Return RAW DETERMINISTIC
    IS
      l_data RAW(2048) := UTL_I18N.STRING_TO_RAW(p_data,'AL32UTF8');
      l_encrypted RAW(2048);
    BEGIN
      l_encrypted := sys.dbms_crypto.encrypt
                     ( src => l_data,
                       typ => ecryption_type,
                       key => v_key );
      Return l_encrypted;
      EXCEPTION
        WHEN OTHERS THEN
          -- for the security reason I want to completely silence the error
          -- stack that could reveal some technical details to imaginary attacker.
          -- Remember, such miss-use of WHEN OTHERS should be considered
          -- as a bug in almost all other situations.
          RAISE_APPLICATION_ERROR(-20001,'Access denied!');
    END encrypt;

    Function decrypt( p_data IN RAW ) Return VARCHAR2 DETERMINISTIC
    IS
      l_decrypted RAW(2048);
    BEGIN
      l_decrypted := sys.dbms_crypto.decrypt
                      ( src => p_data,
                        typ => ecryption_type,
                        key => v_key );
      Return UTL_I18N.RAW_TO_CHAR(l_decrypted,'AL32UTF8');
      EXCEPTION
        WHEN OTHERS THEN
          RAISE_APPLICATION_ERROR(-20001,'Access denied!');
    END decrypt;
End dbcrypt;
 /
Let’s see dbcrypt package in action:
--
-- Let's pretend we want to protect first and
-- last name in table MY_EMP.
-- Note that encrypted values are much larger than
-- non-encrypted, that's why I used VARCHAR2(100)
--
create table my_emp (
 id  number(10) not null,
 first_name varchar2(100),
 last_name  varchar2(100));

--
-- We can prepare view that will decrpyt columns,
-- this view can then be used in application.
--
create or replace view v_my_emp as
  select id,
  substr(dbcrypt.decrypt(first_name),1,35) as First_Name,
  substr(dbcrypt.decrypt(last_name),1,35) as Last_Name
  from my_emp;
--
-- once per session we need to set key that
-- is used fro encryption/decryption for the duration of session.
--
execute dbcrypt.setkey('mysecretpassword');
--
--
-- now, wen can insert some encrypted data
--
insert into my_emp values(1,dbcrypt.encrypt('Bruce'),dbcrypt.encrypt('Scott'));
--
-- you can check that column data is encrypted
--
select id, first_name, last_name from my_emp;

  ID FIRST_NAME                       LAST_NAME
---- -------------------------------- --------------------------------
   1 372EC43843E2782F30B56DA46034324D 65FE9535E2FF1FA61B495C7A29F1779F
--
-- since encryption key was already set (see execute statement above),
-- we can simply select from the view and view will take care
-- of decryption.
--
SQL> select * from v_my_emp;

  ID FIRST_NAME                       LAST_NAME
---- -------------------------------- ----------
   1 Bruce                            Scott
Of course we must be careful that encryption key is not lost and/or exposed (network sniffing, written in some configuration file for application etc.), but this is a different story.
My HTC Hero upgrade to Android 2.1
My Hero was nagging me to update the firmware for a past few days. At first, I didn’t bother to read the message with firmware version details, so I was surprised when I finally gave up yesterday night and checked the HTC web site for firmware details – OTA (over The Air) firmware is available that will upgrade Hero from Android 1.5 to Android 2.1.
Honestly, I expected that 1.6 would be the last supported Android release for Hero. Thanks HTC!
I searched the net for reports that could indicate possible troubles related to 2.1 upgrade, other then “…upgrade will wipe out all your data and settings…“, which is false for OTA based upgrade, couldn’t find anything else.
Just in case some little green ones pop up, I backuped all my data on SD card, then I switched on WiFi connection on Hero and downloaded 80MB update from HTC (depending on your data plan download alone can cost you a small fortune — so don’t do it over 3G on a beach – especially not in Croatia;-), use some free WiFi spot. Fortunately HTC will warn you about that before you start downloading.). The hole process of downloading and installing 2.1 took approximately 30 minutes – make sure your battery is charged!
Everything went smooth with OTA upgrade, way easier then the last time when I upgraded HTC ROM from a PC.
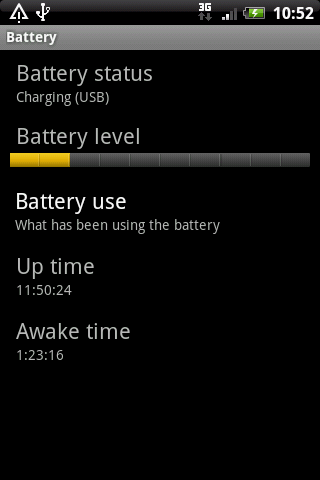
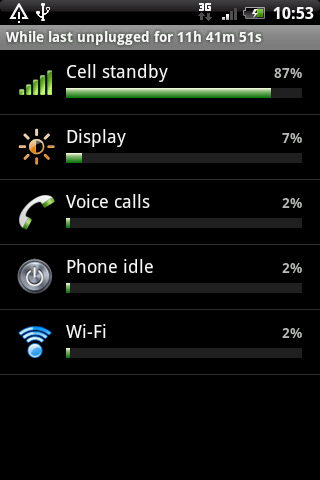
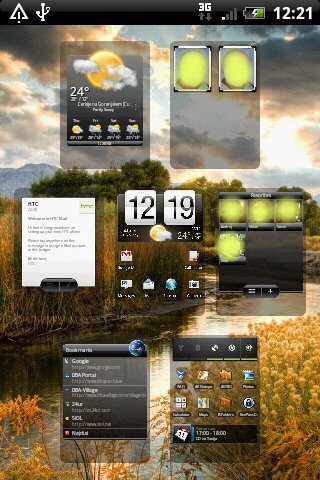
Here are some sample screenshots taken from my Hero 2.1:
1) Firmware version after upgrade

2) New Power Widget (at the top) that I like

3) Settings with icons – I don’t like them, pure text based menu was fine

4) I like the way we can trace down battery usage…

5) Market face lift — unnecessary…

6) I do like the new quick navigation (press Home key when your are already at Home, or even better use “zoom-out” touch on any of the seven main screens)
ASRock mini – Part 1.
I decided to replace one of my very old workstation with much smaller but powerful enough workstation that can easily be moved around the house. I bought ASRock ION 330HT nettop to the delight of my TOH.
My primary OS from now on will be Ubuntu 10.04 – yes, the time has finally come to move from Windows to Linux – at least at home. With the exception of a couple of “MS only” software; VPN client that I need to connect to my workplace and Photomatix HDR software, I can’t think of another reason why would I still need MS Windows at home?
Don’t get me wrong! Windows (XP/7) is stable desktop OS, no question about that – I’m not leaving Windows because of instability or because it’s a closed source, non-free operating system, not even because it’s the most insecure OS out there. No, nothing close to usual fairy tails you can read on the net. I’m changing Windows for Linux because Linux is different: it’s simply fun to use and as such represents a fresh air in my life.
I’ll start a short series of notes dedicated to how did I tweak Ubuntu to serve me at home where I need to test occasionally some Oracle SW, write some python code, scan documents, process RAW pictures from my DSLR camera, etc.
I might even try to put in use remote control that I got with ASRock and that was designated for Windows7 Media Center.
All that said I admit that I decided to dual boot Ubuntu with Windows7, just in case if I don’t find suitable software for processing HDR photos on Linux, at least at the level of Photomatix. Other than that, I hope I could eventually wipe out Windows7 partition.
Installing Ubuntu on ASRock is trivial and will not be covered at all in my notes. Let’s rather start by installing OracleXE and some other tools….
- Optimize ext4 file system (I’m willing to accept some risk associated with it!):
# Step 1)
# I have Ubuntu on /dev/sda5
$ sudo tune2fs -o journal_data_writeback /dev/sda5

# Step 2)
Edit /etc/fstab and change options (I added noatime,data=writeback,barrier=0,nobh), so my fstab for ext4 partition looks like:

#Entry for /dev/sda5 :
UUID=421467f3-e8d5-490b-973e-edf509652bfe	/	ext4	noatime,data=writeback,barrier=0,nobh,errors=rmount-ro  0   1
# Everything must be on the same line!

# Step 3)
Reboot the system.
See note for the reference before changing anything on file system!
-
Install OracleXE – this is trivial…
First edit your /etc/apt/sources.list and add line:$ sudo nano /etc/apt/sources.list
then add the following line at the end:
deb http://oss.oracle.com/debian unstable main non-free
then add GPG key for authorization:
$ wget http://oss.oracle.com/el5/RPM-GPG-KEY-oracle -O- | sudo apt-key add -
$ sudo apt-get update
$ sudo apt-get install oracle-xe

Above command will take care of dependency as well and install libaio (version 0.3.104-1 at the time of this writing).
You must finish OracleXE installation running the script:
$ sudo /etc/init.d/oracle-xe configure

If everything gets configured well, you should see message:

Starting Oracle Net Listener...Done
Configuring Database...Done
Starting Oracle Database 10g Express Edition Instance...Done
Installation Completed Successfully.
To access the Database Home Page go to "http://127.0.0.1:8080/apex"

$ sudo apt-get install oracle-xe-client
Note that I prefer oracle-xe (Western Europe) over oracle-xe-universal, because I can then easily change code page to EE8MSWIN1250 (yes this is not a mistake, my code page of choice on Linux is indeed EE8MSWIN1250 and not for example EE8ISO8859P2).
-
Install some usual tools (listed in arbitrary order):
VLC Player:$ sudo apt-get install vlc vlc-plugin-pulse mozilla-plugin-vlc
KeePassX:
$ sudo apt-get install keepassx
WiFi-Radar:
$ sudo apt-get install wifi-radar
Google Chrome
download deb from http://www.google.com/chrome
Foxit Reader for Linux (my favorite pdf reader on Windows):
download from http://www.foxitsoftware.com/pdf/desklinux/
Install NTFS config (this is dual-boot machine with Windows7):
$ sudo apt-get install ntfs-config
MOS – Community Reviews
I still hate new “Metalink” (My Oracle Support) look and feel, as I do every website that is heavily polluted with flash based content. I’m trying to avoid such sites entirely. Unfortunately, I can’t entirely ignore MOS and simply use supporthtml.oracle.com.
I hope someday Oracle will drop Adobe platform for good, until then I try to easy my pain while working with MOS by seeking some positive aspects from this unfortunate Oracle facelifting.
One feature that I do like is how Community reviews are linked to particular patch/patchset as shown on this sample picture:
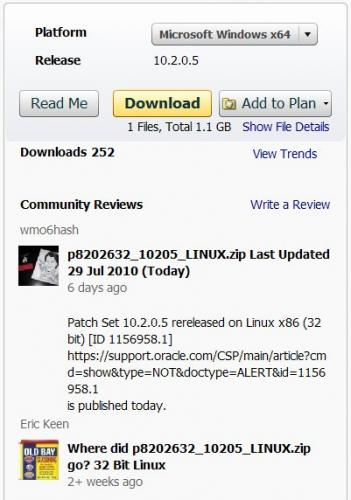
Ok, I admit that 90% of stuff written there is rubbish, but from time to time you can get nice hint/warning about patch/patchset. Definitely something to check before deploying a patch.

You must be logged in to post a comment.